Jeep Cherokee (XJ): Front door latch striker. Front door inside handle actuator. Front door inner belt weatherstrip
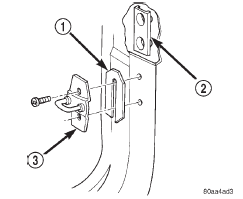
REMOVAL (1) Using a grease pencil or equivalent, mark position
of striker. (2) Remove screws attaching striker to B-pillar
(Fig. 31).
(3) Separate striker from B-pillar.
1 - SPACER INSTALLATION (1) Position and align striker on B-pillar.
(2) Install screws attaching striker to B-pillar.
Tighten screws to 28 N·m (20 ft. lbs.) torque. REMOVAL The front door inside handle actuator is heat
staked to the front door trim panel during the manufacturing
process.
(1) Remove the door trim panel.
(2) Using an X-ACTO knife or equivalent, cut the
melted tabs securing the inside handle to the door
trim panel.
(3) Separate the inside handle from the trim
panel. INSTALLATION (1) Position the inside handle in the trim panel.
(2) Heat stake the inside handle to the trim panel.
(3) Install the door trim panel. REMOVAL (1) Roll window down.
(2) Remove door trim panel.
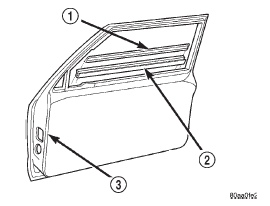
(3) Pull up on the rear corner of the weatherstrip
and lift from the door (Fig. 32).
1 - OUTER BELT WEATHERSTRIP INSTALLATION (1) Position the weatherstrip on the door.
(2) Push weatherstrip down to seat onto door.
(3) Install door trim panel.Front door latch striker

Fig. 31 Front Door Latch Striker
2 - TAPPING PLATE
3 - STRIKERFront door inside handle actuator
Front door inner belt weatherstrip

Fig. 32 Front Door Inner/Outer Belt Weatherstrip
2 - INNER BELT WEATHERSTRIP
3 - DOOR INNER PANEL
 Front door lock cylinder. Lock cylinders. Front door latch
Other materials:
Jack location/spare tire stowage. Preparations for jacking. Jacking instructions
Jack location/spare tire stowage
The jack, wheel chocks and spare tire are stowed under
the load floor behind the rear seat.
1. Open the liftgate.
2. Lift the access cover using the load floor handle.
Load Floor Handle
3. Remove the hook from the stowed position on the
back side of the ...

