Jeep Cherokee (XJ): Hood release cable. Hood safety latch. Safety latch striker
REMOVAL (1) Drill out bellcrank to hood rivet heads and
remove rivets (Fig. 6).
(2) Disconnect bellcrank from latch rod and hood
release cable. Remove bellcrank from hood.
(3) Disconnect hood release cable from clips on
hood.
(4) Remove left cowl side trim panel.
(5) Remove cable bracket screws from cowl side
panel.
(6) Route cable through dash panel and remove it
from under instrument panel.
1 - HOOD INNER PANEL INSTALLATION (1) Insert replacement cable end through hole in
dash panel into engine compartment.
(2) Route cable forward and seat grommet in dash
panel.
(3) Position cable bracket on cowl side panel and
install screws.
(4) Install left cowl side trim panel.
(5) Connect cable and latch rod to bellcrank.
(6) Position bellcrank on hood and install rivets.
(7) Attach cable to clips.
(8) Test release cable for proper operation. REMOVAL (1) Open and support hood.
(2) Remove the nuts attaching the safety latch to
the inner hood panel (Fig. 7).
(3) Separate the safety latch from the hood.
1 - NUT INSTALLATION (1) Position the safety latch on the hood.
(2) Install the nuts attaching the safety latch to
the inner hood panel.
(3) Close hood. REMOVAL (1) Remove striker screws from radiator support
crossmember (Fig. 8).
(2) Remove striker from crossmember. INSTALLATION (1) Position striker on radiator support crossmember
and install screws.
(2) Test safety latch operation.Hood release cable
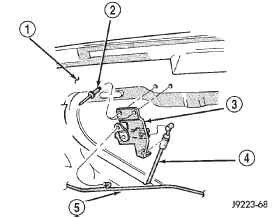
Fig. 6 Hood Release Cable Bellcrank
2 - RIVET
3 - BELLCRANK
4 - LATCH RELEASE CABLE
5 - LATCH CONNECTING RODHood safety latch
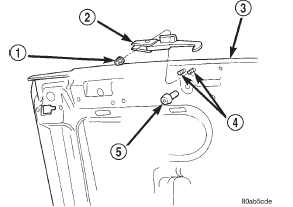
Fig. 7 Hood Safety Latch
2 - HOOD SAFETY LATCH
3 - HOOD
4 - STUD
5 - HOOD BUMPERSafety latch striker
 Hood hinge. Hood latch. Hood latch striker
 Hood silencer pad. Cowl weatherstrip. Cowl grille
Other materials:
Starting procedures
Before starting your vehicle, adjust your seat, adjust both
inside and outside mirrors, and fasten your seat belts.
WARNING!
When leaving the vehicle, always remove the key
fob from the ignition and lock your vehicle. If
equipped with Keyless Enter-N-Go, always make
sure the keyless igni ...