Jeep Cherokee (XJ): Hood silencer pad. Cowl weatherstrip. Cowl grille
REMOVAL (1) Open and support hood.
(2) Remove the hood latch release bellcrank.
(3) Remove the clips attaching the latch connecting
rod to the hood inner panel.
(4) Remove the retainers attaching the hood
silencer pad to the inner hood panel (Fig. 9).
(5) Separate the hood silencer pad from the hood
1 - RADIATOR SUPPORT CROSSMEMBER
1 - HOOD INSTALLATION (1) Position the hood silencer pad on the hood
inner panel.
(2) Install the retainers attaching the hood
silencer pad to the inner hood panel.
(3) Install the clips attaching the latch connecting
rod to the hood inner panel.
(4) Install the hood latch release bellcrank.
(5) Close hood. REMOVAL The cowl weatherstrip is attached to the cowl with
adhesive tape.
(1) Peel weatherstrip from cowl (Fig. 10).
1 - WEATHERSTRIP INSTALLATION (1) Clean contact surface with Mopar Super Kleen
or equivalent.
(2) Position weatherstrip on cowl.
(3) Press weatherstrip into place. REMOVAL (1) Remove the windshield wiper arms from the
pivots.
(2) Remove the screws that attach the grille to the
cowl.
(3) Remove the windshield washer tubes from the
nozzles.
(4) Remove the cowl grille and screen from the
cowl (Fig. 11). INSTALLATION CAUTION: The washer fluid tubes must be routed
and installed so that they are not pinched.
(1) Position the cowl grille and screen on the cowl.
(2) Install the windshield washer tubes on the nozzles.
(3) Install the cowl screen and grille screws with
new sealer. Tighten in sequence (Fig. 12).
1 - PLASTIC PUSH-RIVET NOTE: Force the cowl grille rearward while tightening
the screws.
(4) Install the windshield wiper arms on the pivots.
Hood silencer pad
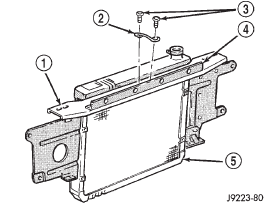
Fig. 8 Hood Safety Latch Striker
2 - HOOD SAFETY LATCH STRIKER
3 - SCREW
4 - GOP BRACKET
5 - RADIATOR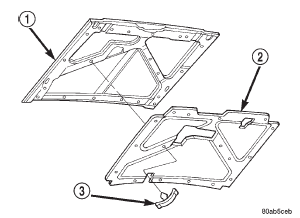
Fig. 9 Hood Silencer Pad
2 - SILENCER PAD
3 - RETAINERCowl weatherstrip
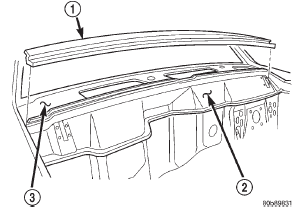
Fig. 10 Cowl Weatherstrip
2 - DASH PANEL
3 - COWLCowl grille
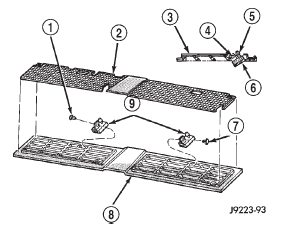
Fig. 11 Cowl Grille, Screen & Washer Nozzles
2 - SCREEN
3 - SCREEN
4 - RIVET
5 - NOZZLE
6 - GRILLE
7 - PLASTIC PUSH-RIVET
8 - GRILLE
9 - NOZZLE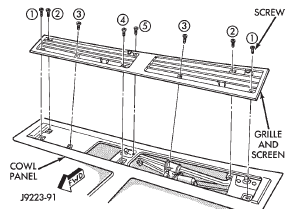
Fig. 12 Cowl Grille Screw Tightening Sequence
 Hood release cable. Hood safety latch. Safety latch striker

Other materials:
Ignition coil-4.0L engine. Crankshaft position (CKP) sensor. Camshaft position sensor-2.5L
engine
Ignition coil-4.0L engine
REMOVAL
A one-piece coil rail assembly containing three
individual coils is used on the 4.0L engine (Fig. 21).
The coil rail must be replaced as one assembly. The
bottom of the coil is equipped with 6 individual rubber
boots (Fig. 21) to seal the 6 spark plugs to the ...