Jeep Cherokee (XJ): Hub bearing and axle shaft. Steering knuckle and ball studs. Differential

Jeep Cherokee (XJ) 1984 - 2001 Service Manual > Differential and driveline > Tube, 181, and 186 FBI axle > Removal and installation > Hub bearing and axle shaft. Steering knuckle and ball studs. Differential

Hub bearing and axle shaft

If the axle shaft and hub bearing are being removed in order to service another component, the axle shaft and hub bearing can be removed as an assembly.

REMOVAL

  1.  Raise and support the vehicle.
  2.  Remove the wheel and tire assembly.
  3.  Remove the brake caliper and rotor. Refer to Group 5, Brakes, for proper procedures.
  4.  Remove ABS wheel speed sensor, if necessary. Refer to Group 5, Brakes, for proper procedures.
  5.  Remove the cotter pin, nut retainer, and axle hub nut (Fig. 22), if necessary.
  6.  Remove the hub to knuckle bolts (Fig. 23).
  7.  Remove the hub from the steering knuckle and axle shaft, if necessary.
  8.  Remove hub bearing and axle shaft assembly (Fig. 24), or axle shaft from axle. Avoid damaging the axle shaft oil seals in the axle housing.

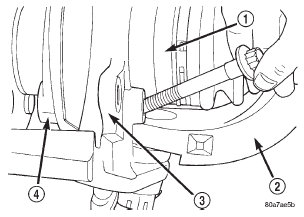
Fig. 23 Hub Bearing Bolts

1 - AXLE SHAFT
2 - AXLE
3 - KNUCKLE
4 - HUB BEARING

  1. Remove the brake rotor shield from the hub bearing or knuckle (Fig. 22).


1 - AXLE
2 - KNUCKLE
3 - HUB BEARING
4 - AXLE SHAFT

INSTALLATION

  1.  Thoroughly clean the axle shaft (Fig. 22) and apply a thin film of Mopart Wheel Bearing Grease, or equivalent, to the shaft splines, seal contact surface, and hub bore.
  2.  Install the brake rotor shield to the knuckle.
  3.  Install the hub bearing and axle shaft assembly, or axle shaft, into the housing and differential side gears. Avoid damaging the axle shaft oil seals in the axle housing.
  4.  Install the hub bearing, if necessary.
  5.  Install the hub to knuckle bolts and tighten to 102 N·m (75 ft. lbs.) torque.
  6. Install the hub washer and nut, if necessary. Tighten the hub nut to 237 N·m (175 ft. lbs.) torque. Install the nut retainer and a new cotter pin (Fig. 22).
  7.  Install ABS wheel speed sensor, if necessary. Refer to Group 5, Brakes, for proper procedures.
  8.  Install the brake rotor and caliper. Refer to Group 5, Brakes, for proper procedures.
  9.  Install the wheel and tire assembly.
  10.  Remove support and lower the vehicle.

Steering knuckle and ball studs

Ball stud service procedures below require removal of the hub bearing and axle shaft. Removal and installation of upper and lower ball studs require the use of Tool Kit 6289.

KNUCKLE REMOVAL

  1.  Remove hub bearing and axle shaft.
  2.  Disconnect the tie-rod or drag link from the steering knuckle arm. Refer to Group 2, Suspension, for proper procedures.
  3. Remove the cotter pins from the upper and lower ball studs.
  4.  Remove the upper and lower ball stud nuts.
  5.  Strike the steering knuckle with a brass hammer to loosen knuckle from the ball studs. Remove knuckle from ball studs (Fig. 25).

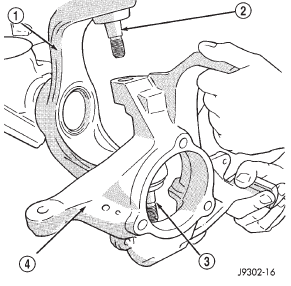
Fig. 25 Steering Knuckle Removal/Installation

1 - AXLE YOKE
2 - UPPER BALL STUD
3 - LOWER BALL STUD
4 - STEERING KNUCKLE

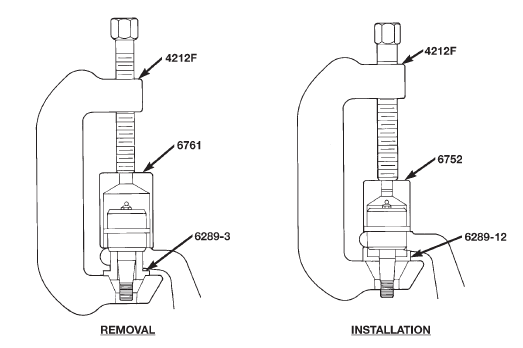
Fig. 26 Upper Ball Stud Remove/Install

UPPER BALL STUD REPLACEMENT

  1.  Position tools as shown to remove and install ball stud (Fig. 26).

LOWER BALL STUD REPLACEMENT

  1.  Position tools as shown to remove and install ball stud (Fig. 27).

KNUCKLE INSTALLATION

  1.  Position the steering knuckle on the ball studs.
  2.  Install and tighten the bottom retaining nut to 109 N·m (80 ft. lbs.) torque. Install new cotter pin.
  3.  Install and tighten the top retaining nut to 101 N·m (75 ft. lbs.) torque. Install new cotter pin.
  4.  Install the hub bearing and axle shaft.
  5.  Connect the tie-rod or drag link end to the steering knuckle arm. Refer to Group 2, Suspension, for proper procedures.

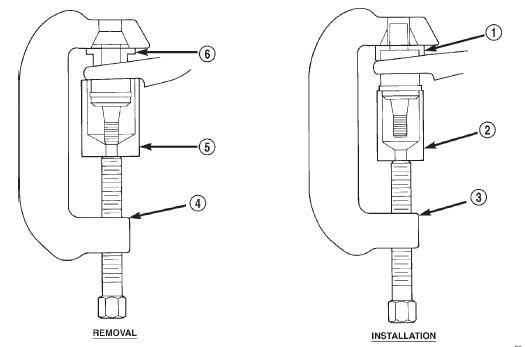
Fig. 27 Lower Ball Stud Remove/Install

1 - SPECIAL TOOL 6289-12
2 - SPECIAL TOOL 6289-4
3 - SPECIAL TOOL 4212F
4 - SPECIAL TOOL 4212F
5 - SPECIAL TOOL 6289-1
6 - SPECIAL TOOL 6289-3

Axle bushing replacement

Refer to Group 2, Suspension, for the proper axle bushing procedures.

Differential

REMOVAL

  1.  Raise and support vehicle.
  2.  Remove the lubricant fill hole plug from the differential housing cover.
  3.  Remove the differential housing cover and allow fluid to drain.
  4.  Remove hub bearings and axle shafts.
  5.  Note the installation reference letters stamped on the bearing caps and housing machined sealing surface (Fig. 28).
  6.  Loosen the differential bearing cap bolts.
  7.  Position Spreader W-129-B, utilizing some items from Adapter Kit 6987, with the tool dowel pins seated in the locating holes (Fig. 29). Install the holddown clamps and tighten the tool turnbuckle finger- tight.

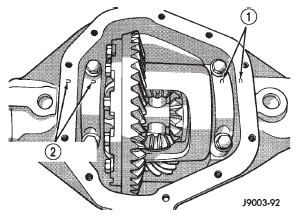
Fig. 28 Bearing Cap Identification

1 - INSTALLATION REFERENCE LETTERS
2 - INSTALLATION REFERENCE LETTERS

Fig. 29 Install Axle Housing Spreader

1 - AXLE HOUSING
2 - DOWEL
3 - SAFETY HOLD DOWN
4 - SPECIAL TOOL W-129-B
5 - TURNBUCKLE

  1. Install a Guide Pin C-3288-B at the left side of the differential housing. Attach Dial Indicator C-3339 to guide pin. Load the lever adapter against the opposite side of the housing (Fig. 30) and zero the indicator. CAUTION: Do not spread over 0.50 mm (0.020 in). If the housing is over-spread, it could be distorted or damaged.
  2.  Spread the housing enough to remove the differential case from the housing. Measure the distance with the dial indicator (Fig. 31).
  3.  Remove the dial indicator.
  4.  While holding the differential case in position, remove the differential bearing cap bolts and caps.
  5.  Remove the differential, and the differential preload shims for the 181FBI axles, from the housing. Ensure that the differential bearing cups remain in position on the differential bearings (Fig. 32).
  6.  Mark or tag the differential bearing cups, and the differential preload shims for the 181FBI axles, to indicate which side of the differential they were removed from.
  7.  Remove spreader from housing.

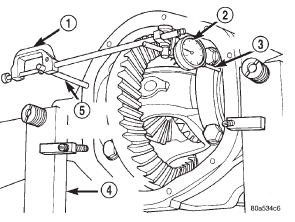
Fig. 30 Install Dial Indicator

1 - SPECIAL TOOL C-3339
2 - DIAL INDICATOR
3 - LEVER ADAPTER
4 - SPECIAL TOOL W-129-B
5 - SPECIAL TOOL C-3288-B

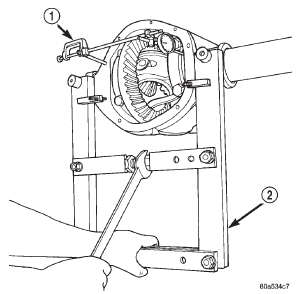
Fig. 31 Spread Axle Housing

1 - SPECIAL TOOL C-3339
2 - SPECIAL TOOL W-129-B

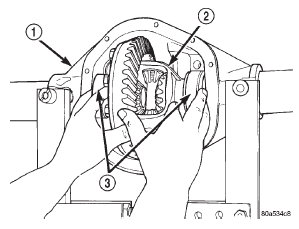
Fig. 32 Differential Case Removal

1 - AXLE HOUSING
2 - DIFFERENTIAL CASE
3 - BEARING CUPS

INSTALLATION

If replacement differential bearings or differential case are being installed, differential side bearing shim requirements may change. Refer to the Differential Bearing Preload and Gear Backlash procedures in this section to determine the proper shim selection.

(1) Position Spreader W-129-B, utilizing some items from Adapter Kit 6987, with the tool dowel pins seated in the locating holes (Fig. 33). Install the holddown clamps and tighten the tool turnbuckle finger- tight.

(2) Install a Guide Pin C-3288-B at the left side of the differential housing. Attach Dial Indicator C-3339 to guide pin. Load the lever adapter against the opposite side of the housing (Fig. 30) and zero the indicator.

CAUTION: Do not spread over 0.50 mm (0.020 in). If the housing is over-spread, it could be distorted or damaged.

(3) Spread the housing enough to install the case in the housing. Measure the distance with the dial indicator (Fig. 31).

(4) Remove the dial indicator.

(5) Install differential case, and the differential preload shims for the 181FBI axles, in the housing.

Ensure that the differential bearing cups remain in position on the differential bearings. Tap the differential case to ensure the bearings cups are fully seated in the housing.

(6) Install the bearing caps at their original locations (Fig. 34).

(7) Loosely install differential bearing cap bolts.

Fig. 33 Install Axle Housing Spreader

1 - AXLE HOUSING
2 - DOWEL
3 - SAFETY HOLD DOWN
4 - SPECIAL TOOL W-129-B
5 - TURNBUCKLE

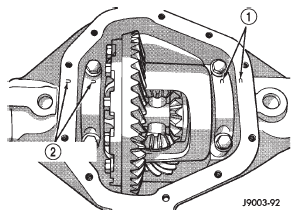
Fig. 34 Differential Bearing Cap Reference Letters

1 - INSTALLATION REFERENCE LETTERS
2 - INSTALLATION REFERENCE LETTERS

(8) Remove axle housing spreader.

(9) Tighten the bearing cap bolts to 61 N·m (45 ft.

lbs.) torque.

(10) Install the hub bearings and axle shafts.

    Previous page181 FBI pinion shaft seal. 186 FBI pinion shaft seal. Collapsible spacer

    181 FBI pinion shaft seal REMOVAL  Raise and support the vehicle.  Remove wheel and tire assemblies.  Remove brake rotors and calipers. Refer to Group 5, Brakes, for proper pr ...

    Next pageDifferential side bearings. Axle shaft oil seal. 181 FBI pinion

    Differential side bearings REMOVAL (1) Remove differential case from axle housing. (2) Remove the bearings from the differential case with Puller/Press C-293-PA, C-293-39 Adapter Blocks, and Plu ...

    Other materials:

    Powertrain control module (PCM)
    DESCRIPTION The Powertrain Control Module (PCM) is located in the engine compartment (Fig. 1). The PCM is referred to as JTEC. OPERATION The PCM operates the fuel system. The PCM is a pre-programmed, triple microprocessor digital computer. It regulates ignition timing, air-fuel ratio, emis ...