Jeep Cherokee (XJ): Instrument panel assembly
WARNING: ON VEHICLES EQUIPPED WITH AIRBAGS, REFER TO GROUP 8M - PASSIVE RESTRAINT SYSTEMS BEFORE ATTEMPTING ANY STEERING WHEEL, STEERING COLUMN, OR INSTRUMENT PANEL COMPONENT DIAGNOSIS OR SERVICE. FAILURE TO TAKE THE PROPER PRECAUTIONS COULD RESULT IN ACCIDENTAL AIRBAG DEPLOYMENT AND POSSIBLE PERSONAL INJURY.
REMOVAL
NOTE: Before starting this procedure, be certain to turn the steering wheel until the front wheels are in the straight-ahead position.
(1) Disconnect and isolate the battery negative cable.
(2) Remove the trim from the left and right cowl side inner panels. Refer to Lower A-Pillar Cowl Trim in the Removal and Installation section of Group 23 - Body for the procedures.
(3) Remove the knee blocker from the instrument panel. Refer to Knee Blocker in the Removal and Installation section of this group for the procedures
(4) Remove the top cover from the instrument panel. Refer to Instrument Panel Top Cover in the Removal and Installation section of this group for the procedures.
(5) Remove the center support bracket from the instrument panel. Refer to Instrument Panel Center Support Bracket in the Removal and Installation section of this group for the procedures.
(6) Remove the steering column from the vehicle.
Refer to Steering Column in the Removal and Installation section of Group 19 - Steering for the procedures.
(7) Remove the screws from the centers of the instrument panel-to-body and the instrument panelto- headlamp and dash wire harness connectors near the left cowl side inner panel and disconnect both connectors.
(8) Remove the screw from the center of the instrument panel-to-floor wire harness connector near the floor panel transmission tunnel under the instrument panel and disconnect the connector.
(9) Disconnect the two wire harness connectors located near the instrument panel-to-floor wire harness connector at the floor panel transmission tunnel under the instrument panel.
(10) Roll down the glove box from the instrument panel. Refer to Glove Box - Roll Down in the Removal and Installation section of this group for the procedures.
(11) Reach through the inboard side of the instrument panel glove box opening to disconnect the two halves of the heater-A/C system vacuum harness connector.
(12) Reach under the right end of the instrument panel to access and disconnect the two halves of the radio antenna coaxial cable connector. On Left-Hand Drive models only, also disengage the retainer on the radio half of the coaxial cable from the heater-A/C housing kick cover.
(13) Loosen the right and left instrument panel cowl side roll down screws about 6 mm (0.25 inch) (Fig. 23).
(14) Remove the four screws and two nuts that secure the top of the instrument panel to the top of the dash panel near the base of the windshield.
(15) With the aid of an assistant, lift the top of the instrument panel assembly off of the two dash panel studs. Then pull the lower instrument panel rearward to clear the cowl side roll down screws.
(16) Remove the instrument panel assembly from the vehicle.
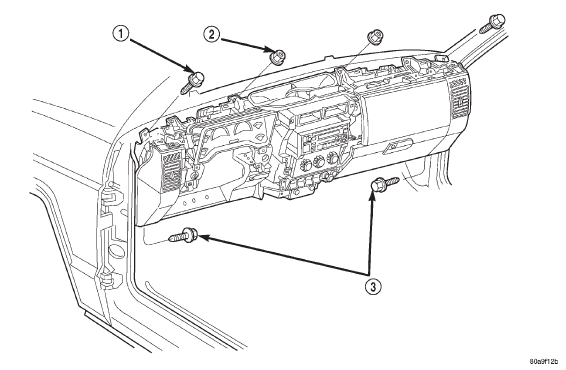
Fig. 23 Instrument Panel Assembly Remove/Install
1 - SCREW
2 - NUT
3 - INSTRUMENT PANEL COWL SIDE ROLL DOWN SCREWS
INSTALLATION
(1) With the aid of an assistant, position the instrument panel assembly onto the cowl side roll down screws and the dash panel studs in the vehicle.
(2) Install and tighten the four screws and two nuts that secure the top of the instrument panel to the top of the dash panel near the base of the windshield.
Tighten the screws and nuts to 7 N·m (60 in.
lbs.).
(3) Tighten the right and left instrument panel cowl side roll down screws. Tighten the screws to 28 N·m (250 in. lbs.).
(4) Reach under the right end of the instrument panel to access and reconnect the two halves of the radio antenna coaxial cable connector. On Left-Hand Drive models only, also engage the retainer on the radio half of the coaxial cable onto the heater-A/C housing kick cover.
(5) Reach through the inboard side of the instrument panel glove box opening to reconnect the two halves of the heater-A/C system vacuum harness connector.
(6) Roll up the glove box into the instrument panel. Refer to Glove Box - Roll Down in the Removal and Installation section of this group for the procedures.
(7) Reconnect the two wire harness connectors located near the instrument panel-to-floor wire harness connector at the floor panel transmission tunnel under the instrument panel.
(8) Reconnect the instrument panel-to-floor wire harness connector near the floor panel transmission tunnel under the instrument panel and tighten the connector screw. Tighten the screw to 4 N·m (35 in.
lbs.).
(9) Reconnect the instrument panel-to-body and the instrument panel-to-headlamp and dash wire harness connectors near the left cowl side inner panel and tighten the connector screws. Tighten the screws to 4 N·m (35 in. lbs.).
(10) Install the steering column into the vehicle.
Refer to Steering Column in the Removal and Installation section of Group 19 - Steering for the procedures.
(11) Install the center support bracket onto the instrument panel. Refer to Instrument Panel Center Support Bracket in the Removal and Installation section of this group for the procedures.
(12) Install the top cover onto the instrument panel. Refer to Instrument Panel Top Cover in the Removal and Installation section of this group for the procedures.
(13) Install the knee blocker onto the instrument panel. Refer to Knee Blocker in the Removal and Installation section of this group for the procedures.
(14) Install the trim onto the left and right cowl side inner panels. Refer to Lower A-Pillar Cowl Trim in the Removal and Installation section of Group 23 - Body for the procedures.
(15) Reconnect the battery negative cable.
 Glove box latch striker. Instrument panel end cap. Instrument panel center support
bracket
Glove box latch striker. Instrument panel end cap. Instrument panel center support
bracket

Other materials:
181 FBI differential bearing preload
and gear backlash
INTRODUCTION
Differential side bearing preload and gear backlash
is achieved by selective shims positioned behind thedifferential side bearing
cones. The proper shim
thickness can be determined using slip-fit dummy
bearings D-348 in place of the differential side bearings
and a dial indicator ...