Jeep Cherokee (XJ): Rear door hinge. Rear door outside handle. Rear door latch
REMOVAL (1) Remove door restrain (check) pin.
(2) Remove door hinge bolts and shims.
(3) Retain bolts and shims for correct installation.
1 - RETAINING PIN INSTALLATION (1) Position hinge plates and shims on door face.
(2) Align door hinges and shims with bolt holes
and install hinges. Tighten bolts to 3 N·m (2 ft. lbs.).
(3) Adjust/align latch striker and latch as necessary.
(4) Install door restrain (check) retaining pin. REMOVAL (1) Remove the door trim panel.
(2) Roll the window to the full up position.
(3) Peel back the waterdam to access the fasteners
for the outside handle.
(4) Remove the latch.
(5) Remove the access hole cover.
(6) Remove the nuts attaching the door handle to
the door (Fig. 49).
(7) Disconnect the handle-to-latch rod from the
handle latch release lever arm (Fig. 50). INSTALLATION (1) Position the handle at the door panel.
(2) Connect the latch-to-handle rod to the handle
latch release lever arm.
(3) Install nuts attaching the door handle to the
door.
(4) Install the latch.
(5) Install the waterdam.
(6) Install the trim panel
1 - INSIDE HANDLE TO LATCH ROD
1 - OUTSIDE HANDLE REMOVAL (1) Remove access plug.
(2) Remove door trim panel.
(3) Remove waterdam.
(4) Remove screws attaching door latch to door
(Fig. 51).
(5) Disconnect all rods from door latch.
(6) Remove door latch from door. INSTALLATION (1) Position door latch in door.
(2) Connect all rods to door latch.
1 - ACCESS HOLE (3) Install screws attaching door latch to door.
Tighten screws to 11 N·m (8 ft. lbs.) torque.
(4) Install waterdam.
(5) Install door trim panel.
(6) Install access plug.Rear door hinge
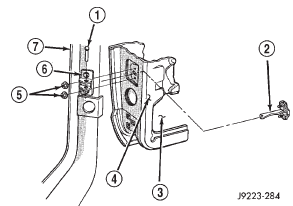
Fig. 48 Door Restraint (Check)
2 - DOOR RESTRAINT
3 - ACCESS OPENING
4 - DOOR INNER PANEL
5 - NUT
6 - RESTRAINT BRACKET
7 - B-PILLARRear door outside handle
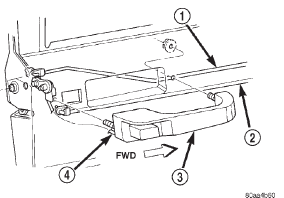
Fig. 49 Rear Door Outside Handle
2 - LOCK TO LATCH ROD
3 - OUTSIDE HANDLE
4 - OUTSIDE HANDLE TO LATCH ROD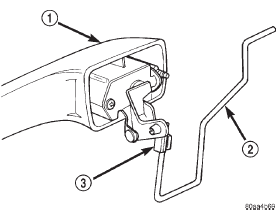
Fig. 50 Latch Rod
2 - OUTSIDE HANDLE TO LATCH ROD
3 - CLIPRear door latch

Fig. 51 Rear Door Latch
2 - INSIDE RELEASE TO LATCH ROD
3 - INSIDE LOCK TO LATCH ROD
4 - HANDLE
5 - LATCH ROD
6 - LATCH ADJUSTMENT SCREW
7 - REAR DOOR
 Rear door waterdam. Rear door. Rear door restraint
 Rear door latch striker. Rear door inside handle actuator. Rear door inner belt weatherstrip
Other materials:
Accelerator pedal. Throttle cable
Accelerator pedal
REMOVAL
The accelerator pedal is connected to the throttle
body linkage by the throttle cable. The cable is protected
by a plastic sheathing and is connected to the
throttle body linkage by a ball socket. It is connected
to the upper part of the accelerator pedal arm by a
pla ...