Jeep Cherokee (XJ): Accumulator. Blend-air door motor. Blower motor
WARNING: REVIEW THE WARNINGS AND CAUTIONS
IN THE FRONT OF THIS GROUP BEFORE
PERFORMING THE FOLLOWING OPERATION. REMOVAL (1) Disconnect and isolate the battery negative
cable.
(2) Recover the refrigerant from the refrigerant
system. See Refrigerant Recovery in this group for
the procedures.
(3) Unplug the wire harness connector from the
low pressure cycling clutch switch.
(4) Loosen the screw that secures the accumulator
retaining band to the support bracket on the dash
panel (Fig. 14).
(5) Disconnect the suction line from the accumulator
outlet tube refrigerant line fitting. See Refrigerant
Line Coupler in this group for the procedures.
Install plugs in, or tape over all of the opened refrigerant
line fittings.
(6) Disconnect the accumulator inlet tube refrigerant
line fitting from the evaporator outlet tube. See
Refrigerant Line Coupler in this group for the procedures.
Install plugs in, or tape over all of the opened
refrigerant line fittings.
(7) Pull the accumulator and retaining band unit
forward until the screw in the band is clear of the
slotted hole in the support bracket on the dash panel.
(8) Remove the accumulator from the vehicle.
1 - LOW PRESSURE CYCLING CLUTCH SWITCH INSTALLATION (1) Install the accumulator and retaining band as
a unit by sliding the screw in the band into the slotted
hole in the support bracket on the dash panel.
(2) Remove the tape or plugs from the refrigerant
line fittings on the accumulator inlet tube and the
evaporator outlet tube. Connect the accumulator inlet
tube refrigerant line coupler to the evaporator outlet
tube. See Refrigerant Line Coupler in this group for
the procedures.
(3) Tighten the accumulator retaining band screw
to 5 N·m (45 in. lbs.).
(4) Remove the tape or plugs from the refrigerant
line fittings on the suction line and the accumulator
outlet tube. Connect the suction line to the accumulator outlet tube refrigerant
line coupler. See Refrigerant
Line Coupler in this group for the procedures.
(5) Plug the wire harness connector into the low
pressure cycling clutch switch.
(6) Connect the battery negative cable.
(7) Evacuate the refrigerant system. See Refrigerant
System Evacuate in this group for the procedures.
(8) Charge the refrigerant system. See Refrigerant
System Charge in this group for the procedures.
NOTE: If the accumulator is replaced, add 120 milliliters
(4 fluid ounces) of refrigerant oil to the
refrigerant system. Use only refrigerant oil of the
type recommended for the compressor in the vehicle. WARNING: ON VEHICLES EQUIPPED WITH AIRBAGS,
REFER TO GROUP 8M - PASSIVE
RESTRAINT SYSTEMS BEFORE ATTEMPTING ANY
STEERING WHEEL, STEERING COLUMN, OR
INSTRUMENT PANEL COMPONENT DIAGNOSIS OR
SERVICE. FAILURE TO TAKE THE PROPER PRECAUTIONS
COULD RESULT IN ACCIDENTAL AIRBAG
DEPLOYMENT AND POSSIBLE PERSONAL
INJURY. REMOVAL (1) Disconnect and isolate the battery negative
cable.
(2) Disconnect the wire connector from the blendair
door motor.
(3) Remove the screws that secure the blend-air
door motor to the housing (Fig. 15).
(4) Remove the blend-air door motor. INSTALLATION (1) Reverse the removal procedures for installation.
(2) Install and tighten the screws that secures the
blend-air door motor to the housing. Tighten the
mounting screws to 1 N·m (10 in. lbs.).
(3) Connect the battery negative cable. REMOVAL (1) If the vehicle is equipped with air conditioning,
recover the refrigerant from the refrigerant system.
See Refrigerant Recovery in this group for the procedures.
(2) Disconnect and isolate the battery negative
cable.
1 - ELECTRICAL CONNECTOR (3) If the vehicle is equipped with air conditioning,
the accumulator must be relocated in order to service
the blower motor. This is done by loosening the accumulator
retaining band screw and disconnecting the
accumulator inlet tube from the evaporator outlet
tube. The accumulator can then be moved far enough
to access and remove the blower motor. See Accumulator
in this group for the procedures.
(4) Unplug the blower motor wire harness connector
(Fig. 16).
(5) Remove the three screws that secure the
blower motor and wheel assembly to the heater-A/C
housing.
(6) Rotate and tilt the blower motor unit as needed
for clearance to remove the blower motor and wheel
from the heater-A/C housing. INSTALLATION (1) Align and install the blower motor and wheel
assembly into the heater-A/C housing.
(2) Install and tighten the three screws that secure
the blower motor and wheel assembly to the heater-
A/C housing. Tighten the mounting screws to 2.2
N·m (20 in. lbs.).
(3) Plug in the blower motor wire harness connector.
(4) If the vehicle is equipped with air conditioning,
connect the accumulator inlet tube to the evaporator
outlet tube and tighten the accumulator retaining
band screw. See Accumulator in this group for the
procedures.
(5) Connect the battery negative cable.
1 - BLOWER MOTOR (6) If the vehicle is equipped with air conditioning,
evacuate the refrigerant system. See Refrigerant System
Evacuate in this group for the procedures.
(7) If the vehicle is equipped with air conditioning,
charge the refrigerant system. See Refrigerant System
Charge in this group for the procedures.Accumulator
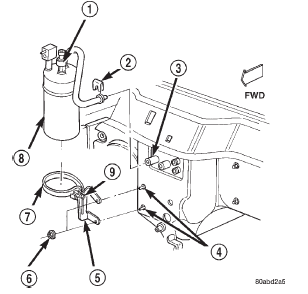
Fig. 14 Accumulator Remove/Install
2 - CLIP
3 - EVAPORATOR
4 - STUDS
5 - BRACKET
6 - NUTS
7 - BAND
8 - ACCUMULATOR
9 - SCREWBlend-air door motor
Blower motor
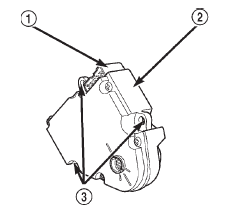
Fig. 15 Blend-Air Door Motor
2 - BLEND-AIR DOOR MOTOR
3 - SCREW MOUNTING POINTS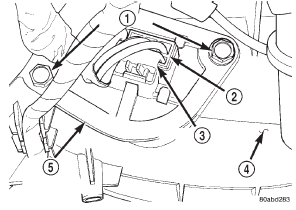
Fig. 16 Blower Motor Remove/Install
2 - WIRE HARNESS CONNECTOR
3 - MOUNTING SCREWS
 Service warnings and precautions
 Blower motor relay. Blower motor resistor. Compressor
Other materials:
Service procedures
Checking fluid level
(1) Be sure transmission fluid is at normal operating
temperature. Normal operating temperature is
reached after approximately 15 miles (25 km) of
operation.
(2) Position vehicle on level surface. This is important
for an accurate fluid level check.
(3) Shift transmiss ...