Jeep Cherokee (XJ): Cleaning and inspection
AX5 MANUAL TRANSMISSION COMPONENTS
GENERAL INFORMATION
Clean the transmission components in solvent. Dry the cases, gears, shift mechanism and shafts with compressed air. Dry the bearings with clean, dry shop towels only. Never use compressed air on the bearings. This could cause severe damage to the bearing roller and race surfaces.
If output shaft or inner race flange thickness is within specification but any gear thrust clearance is out of specification, replace the necessary gear and gear needle bearing as an assembly.
GEAR CASE, ADAPTER/EXTENSION HOUSING, INTERMEDIATE PLATE
Clean the case, housing, and intermediate plate with solvent and dry with compressed air. Replace the case if cracked, porous, or if any of the bearing and gear bores are damaged.
Inspect the threads in the case, housing, and plate.
Minor thread damage can be repaired with steel thread inserts, if necessary. Do not attempt to repair any threads which show evidence of cracks around the threaded hole.
OUTPUT SHAFT
Check thickness of the output shaft and inner bearing race flanges with a micrometer or vernier calipers (Fig. 119).
- Minimum thickness for shaft flange is 4.80 mm (0.189 in.)
- Minimum thickness for first gear bearing inner race flange is 3.99 mm (0.157 in.) Measure diameter of the output shaft journal surfaces with a micrometer. Replace the shaft if either of these surfaces are worn beyond specified limits.
- Second gear surface minimum diameter is 37.964 mm (1.495 in.)
- Third gear surface minimum diameter is 34.984 mm (1.377 in.)
Measure diameter of the first gear bearing inner race. Minimum diameter is 38.985 mm (1.535 in.).
Measure output shaft runout with a dial indicator (Fig. 120). Runout should not exceed 0.05 mm (0.002 in.).
Replace output shaft or first gear inner bearing race if measurement of any surface is out of specification.
Do not attempt to repair out of specification components.
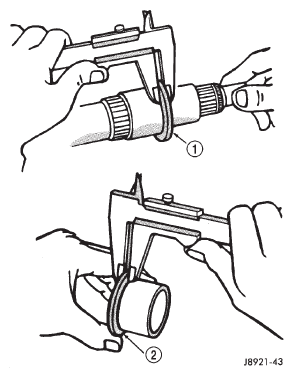
Fig. 119 Check Shaft And Bearing Race Flange Thickness
1 - OUTPUT SHAFT FLANGE
2 - INNER RACE FLANGE
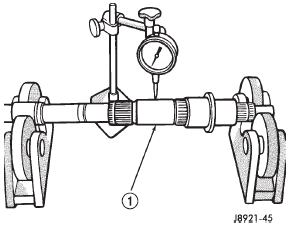
Fig. 120 Check Output Shaft Runout
1 - OUTPUT SHAFT JOURNAL
COUNTERSHAFT
Inspect the countershaft gear teeth. Replace the countershaft if any teeth are worn or damaged.
Inspect the bearing surfaces and replace shaft if any surface shows damage or wear.
Check condition of the countershaft front bearing.
Replace the bearing if worn, noisy, or damaged.
GEAR AND SYNCHRONIZER
Install the needle bearing and inner race in the first gear. Then check oil clearance between the gear and inner race (Fig. 121). Clearance should be 0.009 - 0.032 mm (0.0004 - 0.0013 in.).
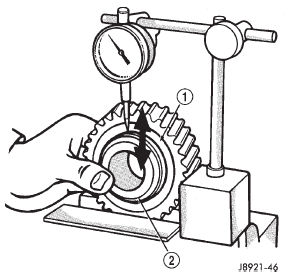
Fig. 121 Check Gear-To-Race Clearance
1 - GEAR
2 - INNER RACE
Install the needle bearings and the second, third and counter fifth gears on the output shaft. Then check oil clearance between the gears and shaft with a dial indicator (Fig. 122). Oil clearance for all three gears is 0.009 - 0.0013 mm (0.0004 - 0.0013 in.).
Check synchronizer ring wear (Fig. 123). Insert each ring in matching gear. Measure clearance between each ring and gear with feeler gauge.
Replace ring if clearance exceeds 2.0 mm (0.078 in.).
Check shift fork-to-synchronizer hub clearance with a feeler gauge (Fig. 124). Replace the fork if clearance exceeds 1.0 mm (0.039 in.).
(1) Inspect all mainshaft gear teeth. Replace any gear which shows any worn or damaged teeth.
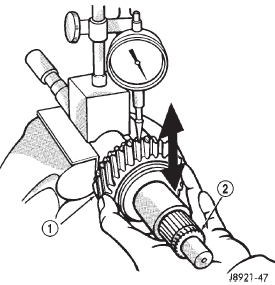
Fig. 122 Check Gear-To-Shaft Oil Clearance
1 - GEAR BEING CHECKED
2 - OUTPUT SHAFT
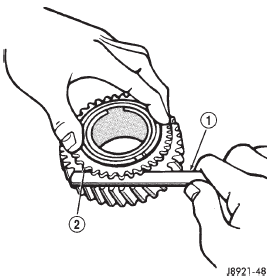
Fig. 123 Check Synchronizer Ring Wear
1 - FEELER GAUGE
2 - SYNCHRONIZER RING
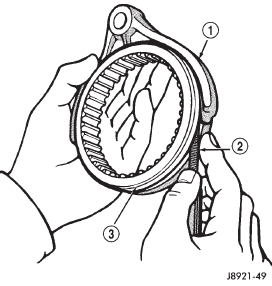
Fig. 124 Check Fork-To-Hub Clearance
1 - SHIFT FORK
2 - FEELER GAUGE
3 - SYNCHRONIZER SLEEVE
 Semi-synchronized reverse idler
gear
Other materials:
Removal and installation
Battery cables
Both the battery negative cable and the battery
positive cable are serviced in the battery wire harness.
If either battery cable is damaged or faulty, the
battery wire harness unit must be replaced.
REMOVAL
(1) Turn the ignition switch to the Off position. Be
certain that all ...

