Jeep Cherokee (XJ): Diagnosis and testing
Base brake components consist of the brake shoes,
calipers, wheel cylinders, brake drums, rotors, brake
lines, master cylinder, booster, and parking brake
components.
Brake diagnosis involves determining if the problem
is related to a mechanical, hydraulic, or vacuum
operated component.
The first diagnosis step is the preliminary check. PRELIMINARY BRAKE CHECK (1) Check condition of tires and wheels. Damaged
wheels and worn, damaged, or underinflated tires
can cause pull, shudder, vibration, and a condition
similar to grab.
(2) If complaint was based on noise when braking,
check suspension components. Jounce front and rear
of vehicle and listen for noise that might be caused
by loose, worn or damaged suspension or steering
components.
(3) Inspect brake fluid level and condition. Note
that the brake reservoir fluid level will decrease in
proportion to normal lining wear. Also note that
brake fluid tends to darken over time. This is
normal and should not be mistaken for contamination.
(a) If fluid level is abnormally low, look for evidence
of leaks at calipers, wheel cylinders, brake
lines, and master cylinder.
(b) If fluid appears contaminated, drain out a
sample to examine. System will have to be flushed
if fluid is separated into layers, or contains a substance
other than brake fluid. The system seals
and cups will also have to be replaced after flushing.
Use clean brake fluid to flush the system.
(4) Check parking brake operation. Verify free
movement and full release of cables and pedal. Also
note if vehicle was being operated with parking
brake partially applied.
(5) Check brake pedal operation. Verify that pedal
does not bind and has adequate free play. If pedal
lacks free play, check pedal and power booster for
being loose or for bind condition. Do not road test
until condition is corrected.
(6) Check booster vacuum check valve and hose.
(7) If components checked appear OK, road test
the vehicle. ROAD TESTING (1) If complaint involved low brake pedal, pump
pedal and note if it comes back up to normal height.
(2) Check brake pedal response with transmission
in Neutral and engine running. Pedal should remain
firm under constant foot pressure.
(3) During road test, make normal and firm brake
stops in 25-40 mph range. Note faulty brake operation
such as low pedal, hard pedal, fade, pedal pulsation,
pull, grab, drag, noise, etc.
(4) Attempt to stop the vehicle with the parking
brake only and note grab, drag, noise, etc. PEDAL FALLS AWAY A brake pedal that falls away under steady foot
pressure is generally the result of a system leak. The
leak point could be at a brake line, fitting, hose, or
caliper/wheel cylinder. If leakage is severe, fluid will
be evident at or around the leaking component.
Internal leakage (seal by-pass) in the master cylinder
caused by worn or damaged piston cups, may
also be the problem cause.
An internal leak in the ABS or RWAL system may
also be the problem with no physical evidence. LOW PEDAL If a low pedal is experienced, pump the pedal several
times. If the pedal comes back up worn linings,
rotors, drums, or rear brakes out of adjustment are
the most likely causes. The proper course of action is
to inspect and replace all worn component and make
the proper adjustments. SPONGY PEDAL A spongy pedal is most often caused by air in the
system. However, thin brake drums or substandard
brake lines and hoses can also cause a spongy pedal.
The proper course of action is to bleed the system,
and replace thin drums and substandard quality
brake hoses if suspected. HARD PEDAL OR HIGH PEDAL EFFORT A hard pedal or high pedal effort may be due to
lining that is water soaked, contaminated, glazed, or
badly worn. The power booster or check valve could
also be faulty. PEDAL PULSATION Pedal pulsation is caused by components that are
loose, or beyond tolerance limits.
The primary cause of pulsation are disc brake
rotors with excessive lateral runout or thickness variation,
or out of round brake drums. Other causes are
loose wheel bearings or calipers and worn, damaged
tires.
NOTE: Some pedal pulsation may be felt during
ABS activation. BRAKE DRAG Brake drag occurs when the lining is in constant
contact with the rotor or drum. Drag can occur at one
wheel, all wheels, fronts only, or rears only.
Drag is a product of incomplete brake shoe release.
Drag can be minor or severe enough to overheat the
linings, rotors and drums.
Minor drag will usually cause slight surface charring
of the lining. It can also generate hard spots in
rotors and drums from the overheat-cool down process.
In most cases, the rotors, drums, wheels and
tires are quite warm to the touch after the vehicle is
stopped.
Severe drag can char the brake lining all the way
through. It can also distort and score rotors and
drums to the point of replacement. The wheels, tires
and brake components will be extremely hot. In
severe cases, the lining may generate smoke as it
chars from overheating.
Common causes of brake drag are: If brake drag occurs at all wheels, the problem
may be related to a blocked master cylinder return
port, or faulty power booster (binds-does not release). BRAKE FADE Brake fade is usually a product of overheating
caused by brake drag. However, brake overheating
and resulting fade can also be caused by riding the
brake pedal, making repeated high deceleration stops
in a short time span, or constant braking on steep
mountain roads. Refer to the Brake Drag information
in this section for causes. BRAKE PULL Front brake pull condition could result from: A worn, damaged wheel bearing or suspension
component are further causes of pull. A damaged
front tire (bruised, ply separation) can also cause
pull.
A common and frequently misdiagnosed pull condition
is where direction of pull changes after a few
stops. The cause is a combination of brake drag followed
by fade at one of the brake units.
As the dragging brake overheats, efficiency is so
reduced that fade occurs. Since the opposite brake
unit is still functioning normally, its braking effect is
magnified. This causes pull to switch direction in
favor of the normally functioning brake unit.
An additional point when diagnosing a change in
pull condition concerns brake cool down. Remember
that pull will return to the original direction, if the
dragging brake unit is allowed to cool down (and is
not seriously damaged). REAR BRAKE GRAB OR PULL Rear grab or pull is usually caused by improperly
adjusted or seized parking brake cables, contaminated
lining, bent or binding shoes and support
plates, or improperly assembled components. This is
particularly true when only one rear wheel is
involved. However, when both rear wheels are
affected, the master cylinder or proportioning valve
could be at fault. BRAKES DO NOT HOLD AFTER DRIVING THROUGH DEEP
WATER PUDDLES This condition is generally caused by water soaked
lining. If the lining is only wet, it can be dried by
driving with the brakes very lightly applied for a
mile or two. However, if the lining is both soaked and
dirt contaminated, cleaning and/or replacement will
be necessary. BRAKE LINING CONTAMINATION Brake lining contamination is mostly a product of
leaking calipers or wheel cylinders, worn seals, driving
through deep water puddles, or lining that has
become covered with grease and grit during repair.
Contaminated lining should be replaced to avoid further
brake problems. WHEEL AND TIRE PROBLEMS Some conditions attributed to brake components
may actually be caused by a wheel or tire problem.
A damaged wheel can cause shudder, vibration and
pull. A worn or damaged tire can also cause pull.
Severely worn tires with very little tread left can
produce a grab-like condition as the tire loses and
recovers traction. Flat-spotted tires can cause vibration
and generate shudder during brake operation. A
tire with internal damage such as a severe bruise,
cut, or ply separation can cause pull and vibration. BRAKE NOISES Some brake noise is common with rear drum
brakes and on some disc brakes during the first few
stops after a vehicle has been parked overnight or
stored. This is primarily due to the formation of trace
corrosion (light rust) on metal surfaces. This light
corrosion is typically cleared from the metal surfaces
after a few brake applications causing the noise to
subside. BRAKE SQUEAK/SQUEAL Brake squeak or squeal may be due to linings that
are wet or contaminated with brake fluid, grease, or
oil. Glazed linings and rotors with hard spots can
also contribute to squeak. Dirt and foreign material
embedded in the brake lining will also cause squeak/
squeal.
A very loud squeak or squeal is frequently a sign of
severely worn brake lining. If the lining has worn
through to the brake shoes in spots, metal-to-metal
contact occurs. If the condition is allowed to continue,
rotors and drums can become so scored that replacement
is necessary. BRAKE CHATTER Brake chatter is usually caused by loose or worn
components, or glazed/burnt lining. Rotors with hard
spots can also contribute to chatter. Additional causes
of chatter are out-of-tolerance rotors, brake lining not
securely attached to the shoes, loose wheel bearings
and contaminated brake lining. THUMP/CLUNK NOISE Thumping or clunk noises during braking are frequently
not caused by brake components. In many
cases, such noises are caused by loose or damaged
steering, suspension, or engine components. However,
calipers that bind on the slide surfaces can generate
a thump or clunk noise. In addition, worn out,
improperly adjusted, or improperly assembled rear
brake shoes can also produce a thump noise. The brake lamp switch operation can be tested
with an ohmmeter. The ohmmeter is used to check
continuity between the pin terminals (Fig. 6). SWITCH CIRCUIT IDENTIFICATION
1 - TERMINAL PINS SWITCH CONTINUITY TEST NOTE: Disconnect switch harness before testing
switch continuity.
With the switch plunger retracted, attach test
leads to terminal pins 1 and 2. Replace switch if
meter indicates no continuity.
With the switch plunger retracted, attach test
leads to terminal pins 3 and 4. Replace switch if
meter indicates no continuity.
With the switch plunger extended, attach test
leads to terminal pins 5 and 6. Replace switch if
meter indicates no continuity. The red brake warning lamp will illuminate under
the following conditions: If the red light remains on after start-up, first verify
that the parking brakes are fully released. Then
check pedal action and fluid level. If the lamp on and
the brake pedal is low this indicates the pressure differential switch and valve
have been actuated due to
a leak in the hydraulic system.
On models with ABS brakes, the amber warning
lamp only illuminates during the self test and when
an ABS malfunction has occurred. The ABS lamp
operates independently of the red warning lamp.
For additional information refer to Group 8W. (1) Start engine and check booster vacuum hose
connections. A hissing noise indicates vacuum leak.
Correct any vacuum leak before proceeding.
(2) Stop engine and shift transmission into Neutral.
(3) Pump brake pedal until all vacuum reserve in
booster is depleted.
(4) Press and hold brake pedal under light foot
pressure. The pedal should hold firm, if the pedal
falls away master cylinder is faulty (internal leakage).
(5) Start engine and note pedal action. It should
fall away slightly under light foot pressure then hold
firm. If no pedal action is discernible, power booster,
vacuum supply, or vacuum check valve is faulty. Proceed
to the POWER BOOSTER VACUUM TEST.
(6) If the POWER BOOSTER VACUUM TEST
passes, rebuild booster vacuum reserve as follows:
Release brake pedal. Increase engine speed to 1500
rpm, close the throttle and immediately turn off ignition
to stop engine.
(7) Wait a minimum of 90 seconds and try brake
action again. Booster should provide two or more vacuum
assisted pedal applications. If vacuum assist is
not provided, booster is faulty. POWER BOOSTER VACUUM TEST (1) Connect vacuum gauge to booster check valve
with short length of hose and T-fitting (Fig. 7).
(2) Start and run engine at curb idle speed for one
minute.
(3) Observe the vacuum supply. If vacuum supply
is not adequate, repair vacuum supply.
(4) Clamp hose shut between vacuum source and
check valve.
(5) Stop engine and observe vacuum gauge.
(6) If vacuum drops more than one inch HG (33
millibars) within 15 seconds, booster diaphragm or
check valve is faulty. POWER BOOSTER CHECK VALVE TEST (1) Disconnect vacuum hose from check valve.
(2) Remove check valve and valve seal from
booster.
(3) Use a hand operated vacuum pump for test.
(4) Apply 15-20 inches vacuum at large end of
check valve (Fig. 8).
1 - TEE FITTING (5) Vacuum should hold steady. If gauge on pump
indicates vacuum loss, check valve is faulty and
should be replaced.
1 - BOOSTER CHECK VALVE PRESSURE DIFFERENTIAL SWITCH (1) Have helper sit in drivers seat to apply brake
pedal and observe red brake warning light.
(2) Raise vehicle on hoist.
(3) Connect bleed hose to a rear wheel cylinder
and immerse hose end in container partially filled
with brake fluid.
(4) Have helper press and hold brake pedal to floor
and observe warning light.
(a) If warning light illuminates, switch is operating
correctly.
(b) If light fails to illuminate, check circuit fuse,
bulb, and wiring. The parking brake switch can be
used to aid in identifying whether or not the brake
light bulb and fuse is functional. Repair or replace
parts as necessary and test differential pressure
switch operation again.
(5) If warning light still does not illuminate,
switch is faulty. Replace combination valve assembly,
bleed brake system and verify proper switch and
valve operation. REAR PROPORTIONING VALVE The valve controls fluid flow. If fluid enters the
valve and does not exit the valve the combination
valve must be replaced. The rotor braking surfaces should not be refinished
unless necessary.
Light surface rust and scale can be removed with a
lathe equipped with dual sanding discs. The rotor
surfaces can be restored by machining in a disc brake
lathe if surface scoring and wear are light.
Replace the rotor under the following conditions: ROTOR MINIMUM THICKNESS Measure rotor thickness at the center of the brake
shoe contact surface. Replace the rotor if worn below
minimum thickness, or if machining would reduce
thickness below the allowable minimum.
Rotor minimum thickness is usually specified on
the rotor hub. The specification is either stamped or
cast into the hub surface. ROTOR RUNOUT Check rotor lateral runout with dial indicator
C-3339 (Fig. 9). Excessive lateral runout will cause
brake pedal pulsation and rapid, uneven wear of the
brake shoes. Position the dial indicator plunger
approximately 25.4 mm (1 in.) inward from the rotor
edge. Maximum allowable rotor runout is 0.102 mm
(0.004 in.).
1 - DIAL INDICATOR ROTOR THICKNESS VARIATION Variations in rotor thickness will cause pedal pulsation,
noise and shudder.
Measure rotor thickness at 6 to 12 points around
the rotor face (Fig. 10).
Position the micrometer approximately 25.4 mm (1
in.) from the rotor outer circumference for each measurement.
Thickness should not vary by more than 0.013 mm
(0.0005 in.) from point-to-point on the rotor. Machine
or replace the rotor if necessary. The maximum allowable diameter of the drum
braking surface is indicated on the drum outer edge.
Generally, a drum can be machined to a maximum of
1.52 mm (0.060 in.) oversize. Always replace the
drum if machining would cause drum diameter to
exceed the size limit indicated on the drum. BRAKE DRUM RUNOUT Measure drum diameter and runout with an accurate
gauge. The most accurate method of measurement
involves mounting the drum in a brake lathe
and checking variation and runout with a dial indicator.
Variations in drum diameter should not exceed
0.076 mm (0.003 in.). Drum runout should not exceed
0.20 mm (0.008 in.) out of round. Machine the drum
if runout or variation exceed these values. Replace the drum if machining causes
the drum to exceed the
maximum allowable diameter.
1 - MICROMETER Flexible rubber hose is used at both front brakes
and at the rear axle junction block. Inspect the hoses
whenever the brake system is serviced, at every
engine oil change, or whenever the vehicle is in for
service.
Inspect the hoses for surface cracking, scuffing, or
worn spots. Replace any brake hose immediately if
the fabric casing of the hose is exposed due to cracks
or abrasions.
Also check brake hose installation. Faulty installation
can result in kinked, twisted hoses, or contact
with the wheels and tires or other chassis components.
All of these conditions can lead to scuffing,
cracking and eventual failure.
The steel brake lines should be inspected periodically
for evidence of corrosion, twists, kinks, leaks, or
other damage. Heavily corroded lines will eventually
rust through causing leaks. In any case, corroded or
damaged brake lines should be replaced.
Factory replacement brake lines and hoses are recommended
to ensure quality, correct length and superior
fatigue life. Care should be taken to make sure
that brake line and hose mating surfaces are clean
and free from nicks and burrs. Also remember that
right and left brake hoses are not interchangeable.
Use new copper seal washers at all caliper connections.
Be sure brake line connections are properly
made (not cross threaded) and tightened to recommended
torque. Indications of fluid contamination are swollen or
deteriorated rubber parts.
Swollen rubber parts indicate the presence of
petroleum in the brake fluid.
To test for contamination, put a small amount of
drained brake fluid in clear glass jar. If fluid separates
into layers, there is mineral oil or other fluid
contamination of the brake fluid.
If brake fluid is contaminated, drain and thoroughly
flush system. Replace master cylinder, proportioning
valve, caliper seals, wheel cylinder seals,
Antilock Brakes hydraulic unit and all hydraulic
fluid hoses.Base brake system
Brake lamp switch
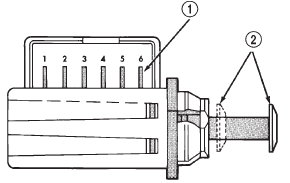
Fig. 6 Brake Lamp Switch Terminal Identification
2 - PLUNGER TEST POSITIONSRed brake warning lamp
Master cylinder/power booster
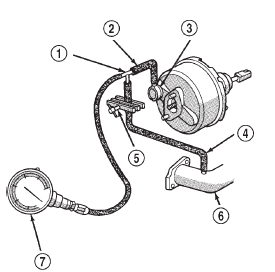
Fig. 7 Typical Booster Vacuum Test Connections
2 - SHORT CONNECTING HOSE
3 - CHECK VALVE
4 - CHECK VALVE HOSE
5 - CLAMP TOOL
6 - INTAKE MANIFOLD
7 - VACUUM GAUGE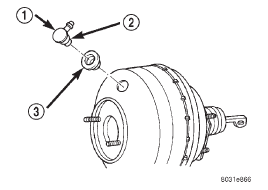
Fig. 8 Vacuum Check Valve And Seal
2 - APPLY TEST VACUUM HERE
3 - VALVE SEALCombination valve
Disc brake rotor
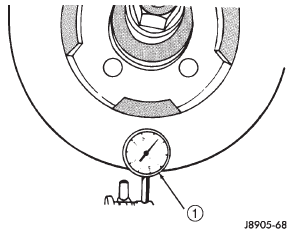
Fig. 9 Checking Rotor Runout And Thickness VariationBrake drum
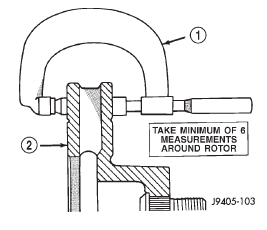
Fig. 10 Measuring Rotor Thickness
2 - ROTORBrake line and hoses
Brake fluid contamination


Other materials:
Description and operation
Horn system
DESCRIPTION
A dual-note electric horn system is standard factory-
installed equipment on this model. The standard
equipment horn system features one low-note horn
unit and one high-note horn unit. The horn system
uses a non-switched source of battery current so that
the system will ...