Jeep Cherokee (XJ): Disassembly and assembly
NV242 TRANSFER CASE
DISASSEMBLY
REAR RETAINER REMOVAL
(1) Remove output shaft boot. Spread band clamp that secures boot on slinger with a suitable awl.
Then slide boot off shaft (Fig. 10).
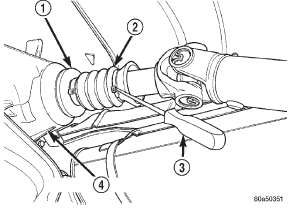
Fig. 10 Output Boot-Typical
1 - SLINGER
2 - BOOT
3 - AWL
4 - TRANSFER CASE
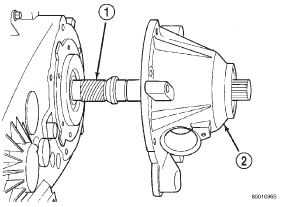
(2) Using puller MD-998056-A, remove rear slinger (Fig. 11).
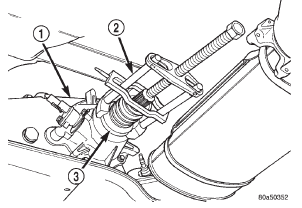
Fig. 11 Rear Slinger Removal
1 - TRANSFER CASE
2 - SPECIAL TOOL MD998056-A
3 - SLINGER
(3) Remove rear seal from retainer (Fig. 12). Use pry tool, or collapse seal with punch to remove it.
1 - REAR RETAINER
2 - OUTPUT SHAFT SEAL
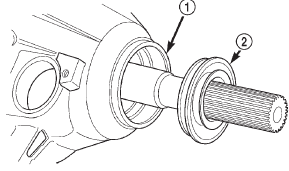
(4) Remove rear output bearing I. D. retaining ring (Fig. 13).
1 - SNAP RING PLIERS
2 - REAR BEARING I. D. RETAINING RING
(5) Remove speedometer adapter.
(6) Remove rear retainer bolts.
(7) Remove rear retainer. Tap retainer with mallet and pry upward to break sealer bead. Then slide retainer off case and output shaft (Fig. 14).
(8) Remove rear bearing O. D. retaining ring with snap ring pliers. Then tilt pump and slide it off output shaft (Fig. 15) (9) Remove pickup tube O-ring from pump (Fig.
16) but do not disassemble pump; it is not a repairable part.
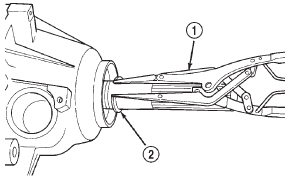
(10) Remove seal from oil pump with pry tool.
1 - MAINSHAFT
2 - REAR RETAINER
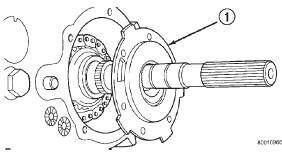
1 - OIL PUMP
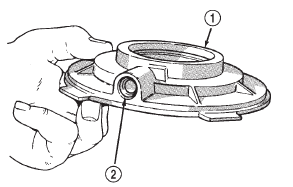
1 - OIL PUMP
2 - O-RING
(11) Remove bolts attaching rear case to front case (Fig. 17). Note position of the two black finish bolts at each end of the case. These bolts go through the case dowels and require a washer under the bolt head.
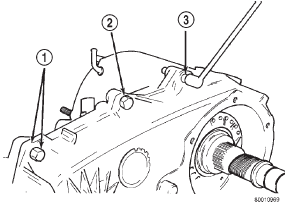
Fig. 17 Spline And Dowel Bolt Locations
1 - DOWEL BOLT AND WASHER (2)
2 - CASE BOLT (5)
3 - SPLINE HEAD BOLT (1)
(12) Remove rear case from front case (Fig. 18).
Insert screwdrivers into slots cast into each end of case. Then pry upward to break sealer bead and remove rear case.
CAUTION: Do not pry on the sealing surface of either case half as the surfaces will become damaged.
Fig. 18 Loosening/Removing Rear case
1 - MAINSHAFT
2 - SCREWDRIVER
3 - FRONT CASE
4 - SCREWDRIVER
5 - REAR CASE
(13) Remove oil pickup tube and screen from rear case (Fig. 19).
Fig. 19 Oil Pickup Screen, Hose And Tube Removal
1 - CONNECTING HOSE
2 - PICKUP SCREEN
3 - PICKUP TUBE
YOKE AND RANGE LEVER REMOVAL
(1) Remove front yoke nut: (a) Move range lever to 4L position.
(b) Remove nut with socket and impact wrench (Fig. 20).
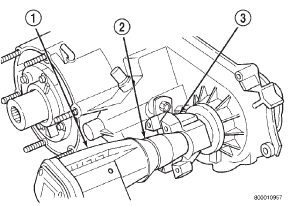
Fig. 20 Yoke Nut Removal
1 - IMPACT WRENCH
2 - SOCKET
3 - YOKE
(2) Remove yoke. If yoke is difficult to remove by hand, remove it with bearing splitter, or with standard two jaw puller (Fig. 21). Be sure puller tool is positioned on yoke and not on slinger as slinger will be damaged.
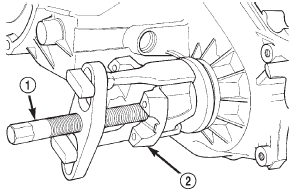
Fig. 21 Yoke Removal
1 - PULLER TOOL
2 - YOKE
(3) Remove seal washer from front output shaft.
Discard washer as it should not be reused.
(4) Remove nut and washer that attach range lever to sector shaft. Then move sector to neutral position and remove range lever from shaft (Fig. 22).
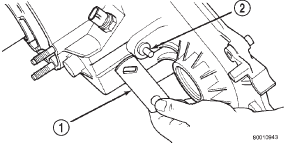
Fig. 22 Range Lever Removal
1 - RANGE LEVER
2 - SECTOR SHAFT
FRONT OUTPUT SHAFT AND DRIVE CHAIN REMOVAL
(1) Remove drive sprocket snap-ring (Fig. 23).
(2) Remove drive sprocket and chain (Fig. 24).
(3) Remove front output shaft (Fig. 25).
SHIFT FORKS AND MAINSHAFT REMOVAL AND DISASSEMBLY
(1) Remove shift detent plug, spring and pin (Fig.
26).
(2) Remove seal plug from low range fork lockpin access hole. Then move shift sector to align low range fork lockpin with access hole.
(3) Remove range fork lockpin with size number one easy-out tool as follows:
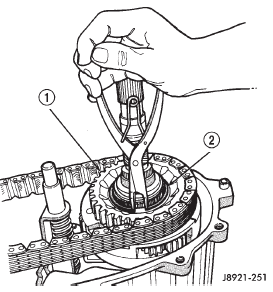
Fig. 23 Drive Sprocket Snap-Ring Removal
1 - DRIVE SPROCKET
2 - DRIVE SPROCKET SNAP RING
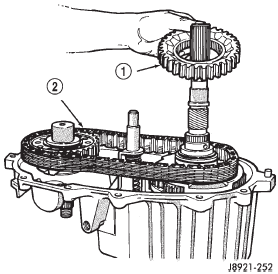
Fig. 24 Drive Sprocket And Chain Removal
1 - DRIVE SPROCKET
2 - DRIVE CHAIN
(a) Insert easy-out tool through access hole in side of transfer case and into lock-pin.
(b) Tap easy-out tool into lock-pin with hammer until tool is securely engaged into the lock-pin.
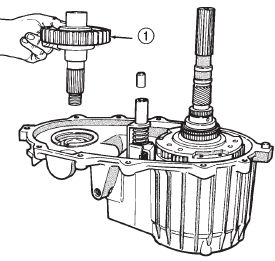
Fig. 25 Removing Front Output Shaft
1 - FRONT OUTPUT SHAFT

Fig. 26 Detent Component Removal
1 - PLUNGER
2 - O-RING
3 - PLUG
4 - SPRING
(c) Install a t-handle, such as from a tap and die set, onto the easy-out tool.
(d) Securely tighten the t-handle onto the tool.
(e) In one motion, pull upward and turn the t-handle counter-clockwise to remove the lock-pin.
(4) Remove shift rail by pulling it straight up and out of fork (Fig. 27).
(5) Remove mode fork and mainshaft as assembly (Fig. 28).
(6) Remove mode shift sleeve and mode fork assembly from mainshaft (Fig. 29). Note position
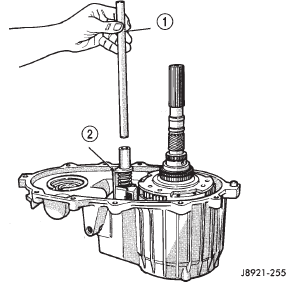
Fig. 27 Shift Rail Removal
1 - SHIFT RAIL
2 - MODE FORK
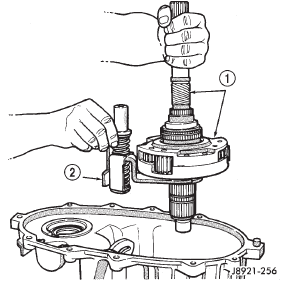
Fig. 28 Mode Fork And Mainshaft Removal
1 - MAINSHAFT ASSEMBLY
2 - MODE FORK
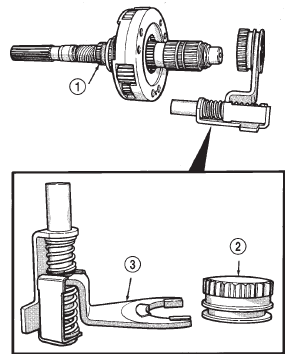
Fig. 29 Mode Fork And Sleeve Removal
1 - MAINSHAFT
2 - SLEEVE
3 - MODE FORK ASSEMBLY
(7) Remove intermediate clutch shaft snap-ring (Fig. 30).
(8) Remove clutch shaft thrust ring (Fig. 31).
(9) Remove intermediate clutch shaft (Fig. 32).
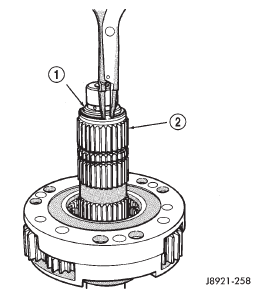
Fig. 30 Intermediate Clutch Shaft Snap-Ring Removal
1 - SNAP RING
2 - INTERMEDIATE CLUTCH SHAFT
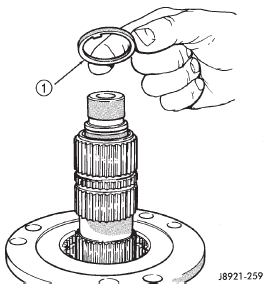
Fig. 31 Clutch Shaft Thrust Ring Removal
1 - CLUTCH SHAFT THRUST RIN
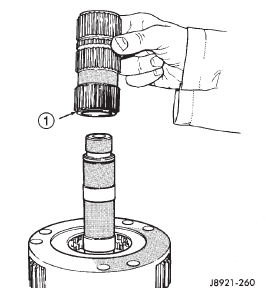
Fig. 32 Intermediate Clutch Shaft Removal
1 - INTERMEDIATE CLUTCH SHAFT
(10) Remove differential snap-ring (Fig. 33).
(11) Remove differential (Fig. 34).
(12) Remove differential needle bearings and both needle bearing thrust washers from mainshaft.

Fig. 33 Differential Snap-Ring Removal
1 - DIFFERENTIAL SNAP RING
(13) Slide low range fork pin out of shift sector slot (Fig. 35).
(14) Remove low range fork and hub (Fig. 36).
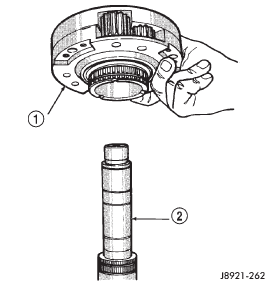
Fig. 34 Differential Removal
1 - DIFFERENTIAL
2 - MAINSHAFT
(15) Remove shift sector (Fig. 37).
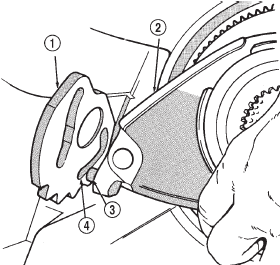
Fig. 35 Disengaging Low Range Fork
1 - SHIFT SECTOR
2 - LOW RANGE FORK
3 - PIN
4 - SLOT
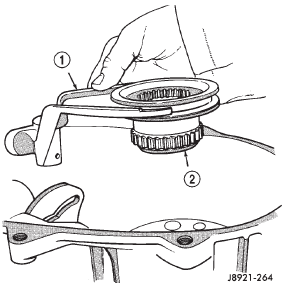
Fig. 36 Low Range Fork And Hub Removal
1 - LOW RANGE FORK
2 - FORK HUB
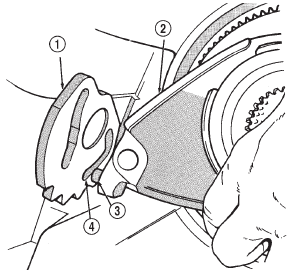
Fig. 37 Shift Sector Position
1 - SHIFT SECTOR
2 - LOW RANGE FORK
3 - PIN
4 - SLOT
(16) Remove shift sector bushing and O-ring (Fig.
38).
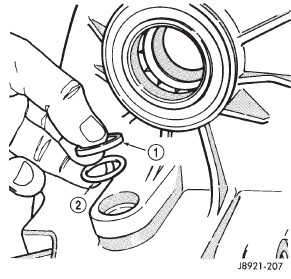
Fig. 38 Sector Bushing And O-Ring Removal
1 - SHIFT SECTOR BUSHING
2 - O-RING
INPUT GEAR/LOW RANGE ASSEMBLY REMOVAL AND DISASSEMBLY
(1) Remove front bearing retainer bolts.
(2) Remove front bearing retainer. Carefully pry retainer loose with screwdriver (Fig. 39). Position screwdriver in slots cast into retainer.
(3) Remove input gear snap-ring (Fig. 40).
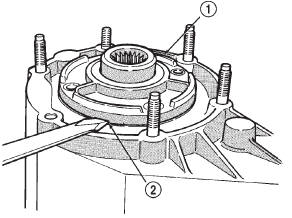
Fig. 39 Front Bearing Retainer Removal
1 - FRONT BEARING RETAINER
2 - RETAINER SLOT
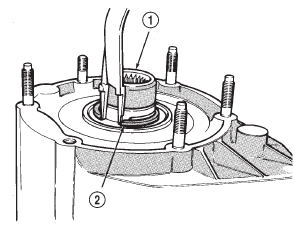
Fig. 40 Input Gear Snap-Ring Removal
1 - INPUT GEAR
2 - SNAP RING
(4) Remove input/low range gear assembly from bearing with Tool Handle C-4171 and Tool 7829A (Fig. 41).
(5) Remove low range gear snap-ring (Fig. 42).
(6) Remove input gear retainer, thrust washers and input gear from low range gear (Fig. 43).
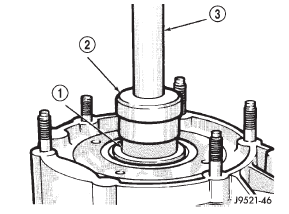
Fig. 41 Input And Low Range Gear Assembly Removal
1 - INPUT-LOW RANGE GEARS
2 - SPECIAL TOOL 7829A
3 - SPECIAL TOOL C-4171
(7) Inspect low range annulus gear (Fig. 44). Gear is not a serviceable component. If damaged, replace gear and front case as assembly.
(8) Remove oil seals from following components:
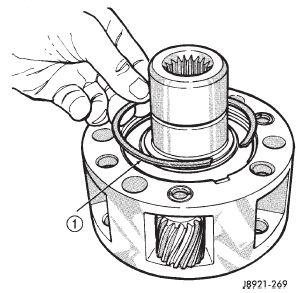
Fig. 42 Low Range Gear Snap-Ring Removal/ Installation
1 - LOW RANGE GEAR SNAP RING
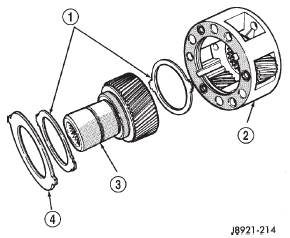
Fig. 43 Low Range Gear Disassembly
1 - THRUST WASHERS
2 - LOW RANGE GEAR
3 - INPUT GEAR
4 - RETAINER
- front bearing retainer.
- rear retainer.
- oil pump.
- case halves.
Fig. 44 Inspecting Low Range Annulus Gear
1 - LOW RANGE ANNULUS GEAR
DIFFERENTIAL DISASSEMBLY
(1) Mark differential case halves for reference.
(2) Remove differential case bolts.
(3) Invert differential on workbench.
(4) Separate top case from bottom case. Use slots in case halves to pry them apart (Fig. 45).
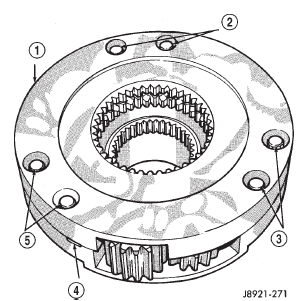
Fig. 45 Separating Differential Case Halves
1 - TOP CASE
2 - CASE BOLTS
3 - CASE BOLTS
4 - CASE SLOTS
5 - CASE BOLTS
(5) Remove thrust washers and planet gears from case pins (Fig. 46).
(6) Remove mainshaft and sprocket gears from bottom case (Fig. 47). Note gear position for reference before separating them.
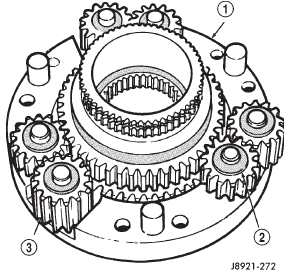
Fig. 46 Planet Gears And Thrust Washer Removal
1 - BOTTOM CASE
2 - THRUST WASHERS (12)
3 - PLANET GEARS (6)
ASSEMBLY
Lubricate transfer case components with automatic transmission fluid or petroleum jelly (where indicated) during assembly.
CAUTION: The bearing bores in various transfer case components contain oil feed holes. Make sure replacement bearings do not block the holes.
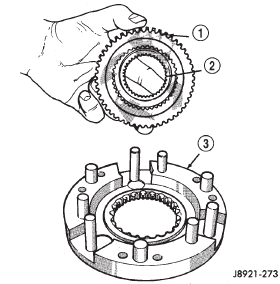
Fig. 47 Mainshaft And Sprocket Gear Removal
1 - MAINSHAFT GEAR
2 - SPROCKET GEAR
3 - BOTTOM CASE
BEARING AND SEAL INSTALLATION
(1) Remove snap-ring that retains front output shaft front bearing in case (Fig. 48). Then remove bearing. Use hammer handle, or hammer and brass punch to tap bearing out of case.
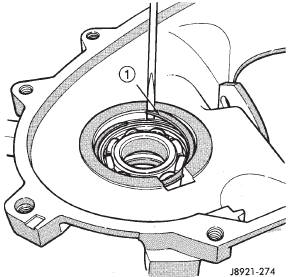
Fig. 48 Front Output Shaft Front Bearing Snap-Ring Removal
1 - FRONT BEARING SNAP
(2) Install new front output shaft front bearing with Tool Handle C-4171 and Installer 8033A with the tapered cone upward (Fig. 49).
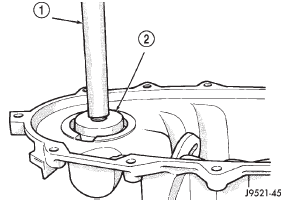
Fig. 49 Front Output Shaft Front Bearing Installation
1 - SPECIAL TOOL C-4171
2 - SPECIAL TOOL 8033A
(3) Install front bearing snap-ring (Fig. 48).
(4) Remove front output shaft seal using an appropriate pry tool (Fig. 50) or slide-hammer mounted screw.
(5) Install new front output shaft oil seal with Installer 6952-A (Fig. 51).
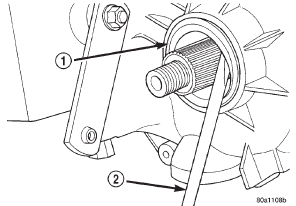
Fig. 50 Remove Front Output Shaft Seal
1 - OUTPUT SHAFT SEAL
2 - PRYBAR
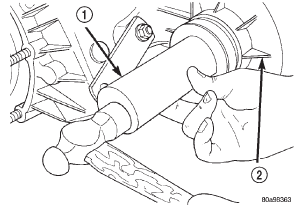
Fig. 51 Install Front Output Shaft Seal
1 - INSTALLER 6952-A
2 - TRANSFER CASE
(6) Remove input gear bearing with Tool Handle C-4171 and Remover C-4210 (Fig. 52).
(7) Install snap-ring on new input gear bearing.
(8) Install new input gear bearing with Tool Handle C-4171 and Remover C-4210. Install bearing far enough to seat snap-ring against case (Fig. 53).
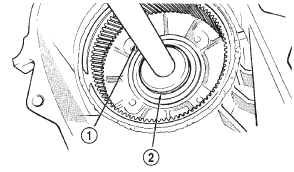
Fig. 52 Input Gear Bearing Removal
1 - SPECIAL TOOL C-4171
2 - SPECIAL TOOL C-4210
(9) Remove the input gear pilot bearing by inserting a suitably sized drift into the splined end of the input gear and driving the bearing out with the drift and a hammer (Fig. 54).
(10) Install new pilot bearing with Installer 8128 and Handle C-4171 (Fig. 55).
(11) Install new seal in front bearing retainer with Installer 7884 (Fig. 56).
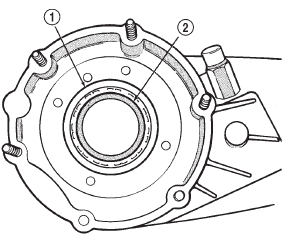
Fig. 53 Seating Input Gear Bearing
1 - SNAP RING
2 - INPUT SHAFT BEARING
Fig. 54 Remove Input Gear Pilot Bearing
1 - DRIFT
2 - INPUT GEAR
(12) Remove output shaft rear bearing with the screw and jaws from Remover L-4454 and Cup 8148 (Fig. 57).
Fig. 55 Install Input Gear Pilot Bearing
1 - HANDLE C-4171
2 - INSTALLER 8128
3 - INPUT GEAR
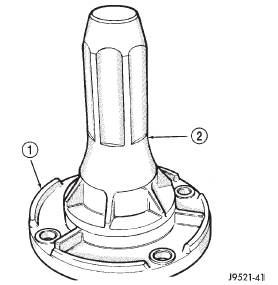
Fig. 56 Front Bearing Retainer Seal Installation
1 - FRONT BEARING RETAINER
2 - SPECIAL TOOL 7884
(13) Install new bearing with Tool Handle C-4171 and Installer 5066 (Fig. 58). Lubricate bearing after installation.
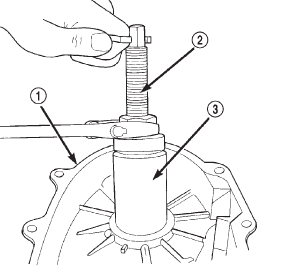
Fig. 57 Remove Front Output Shaft Rear Bearing
1 - REAR CASE
2 - SPECIAL TOOL L-4454-1 AND L-4454-3
3 - SPECIAL TOOL 8148
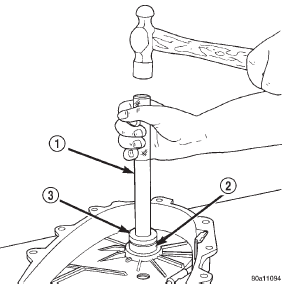
Fig. 58 Install Front Output Shaft Rear Bearing
1 - HANDLE C-4171
2 - OUTPUT SHAFT INNER BEARING
3 - INSTALLER 5066
(14) Install new seal in oil pump feed housing with Special Tool 7888 (Fig. 59).
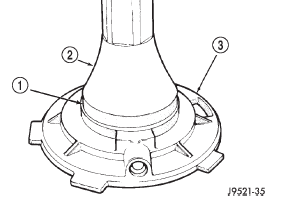
Fig. 59 Oil Pump Seal Installation
1 - HOUSING SEAL
2 - SPECIAL TOOL 7888
3 - OIL PUMP FEED HOUSING
(15) Install new pickup tube O-ring in oil pump (Fig. 60).
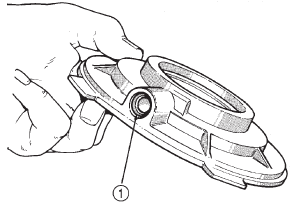
Fig. 60 Pickup Tube O-Ring Installation
1 - PICKUP TUBE O-RING
DIFFERENTIAL ASSEMBLY
(1) Lubricate differential components with automatic transmission fluid.
(2) Install sprocket gear in differential bottom case (Fig. 61).
(3) Install differential planet gears and new thrust washers (Fig. 62). Be sure thrust washers are installed at top and bottom of each planet gear.
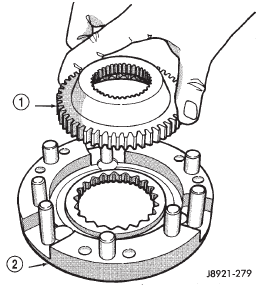
Fig. 61 Installing Differential Sprocket Gear
1 - SPROCKET GEAR
2 - BOTTOM CASE
(4) Install differential mainshaft gear (Fig. 62).
(5) Align and position differential top case on bottom case (Fig. 63). Align using scribe marks made at disassembly.
(6) While holding differential case halves together, invert the differential and start the differential case bolts.
(7) Tighten differential case bolts to specified torque.
INPUT GEAR/LOW RANGE ASSEMBLY
(1) Assemble low range gear, input gear thrust washers, input gear and input gear retainer (Fig. 64).
(2) Install low range gear snap ring (Fig. 65).
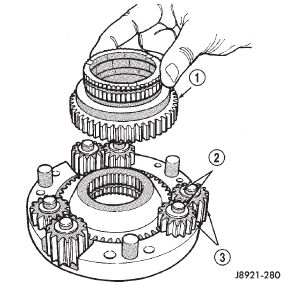
Fig. 62 Installing Mainshaft And Planet Gears
1 - MAINSHAFT GEAR
2 - THRUST WASHERS (12)
3 - PLANET GEARS (6)
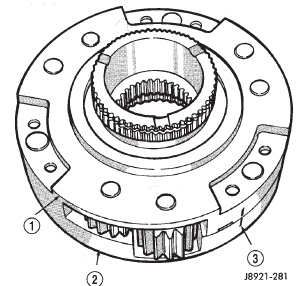
Fig. 63 Differential Case Assembly
1 - TOP CASE
2 - BOTTOM CASE
3 - CASE ALIGNMENT MARKS
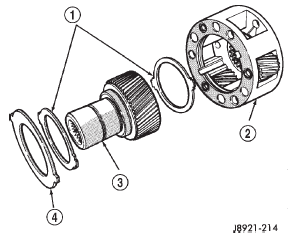
Fig. 64 Low Range And Input Gear Assembly
1 - THRUST WASHERS
2 - LOW RANGE GEAR
3 - INPUT GEAR
4 - RETAINER
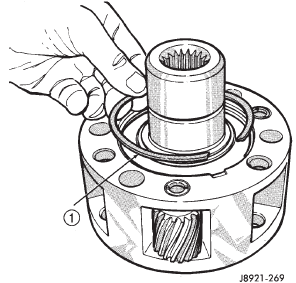
Fig. 65 Install Low Range Gear Snap Ring
1 - LOW RANGE GEAR SNAP RING
(3) Lubricate input gear and low range gears with automatic transmission fluid.
(4) Start input gear shaft into front case bearing.
(5) Press input gear shaft into front bearing.
(6) Install new input gear snap ring (Fig. 66).
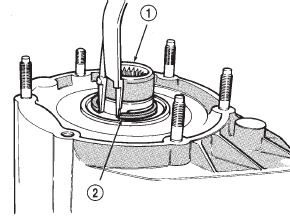
Fig. 66 Input Gear Snap Ring Installation
1 - INPUT GEAR
2 - SNAP RING
(7) Apply 3 mm (1/8 in.) wide bead of Mopart gasket maker or silicone adhesive sealer to seal surface of front bearing retainer.
(8) Install front bearing retainer (Fig. 67). Tighten retainer bolts to 16 ft. lbs. (21 N·m) torque.
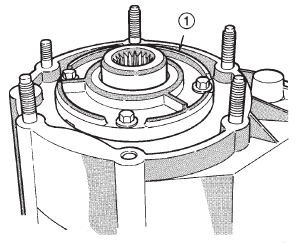
Fig. 67 Installing Front Bearing Retainer
1 - FRONT BEARING RETAINER
SHIFT FORKS AND MAINSHAFT INSTALLATION
(1) Install new sector shaft O-ring and bushing (Fig. 68).
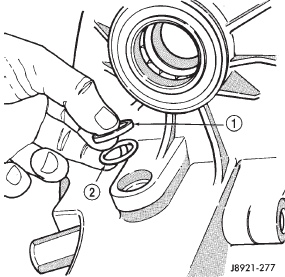
Fig. 68 Sector O-Ring And Bushing Installation
1 - SECTOR BUSHING
2 - O-RING
(2) Install shift sector.
(3) Install new pads on low range fork, if necessary, (Fig. 69).
(4) Assemble low range fork and hub (Fig. 69).
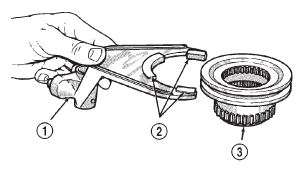
Fig. 69 Assembling Low Range Fork And Hub
1 - LOW RANGE FORK
2 - PADS
3 - HUB
(5) Position low range fork and hub in case. Be sure low range fork pin is engaged in shift sector slot (Fig. 70).
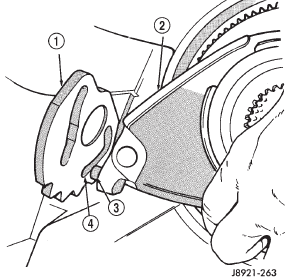
Fig. 70 Positioning Low Range Fork
1 - SHIFT SECTOR
2 - LOW RANGE FORK
3 - PIN
4 - SLOT
(6) Install first mainshaft bearing spacer on mainshaft (Fig. 71).
(7) Install bearing rollers on mainshaft (Fig. 71).
Coat bearing rollers with generous quantity of petroleum jelly to hold them in place.
(8) Install remaining bearing spacer on mainshaft (Fig. 71). Do not displace any bearings while installing spacer.
(9) Install differential (Fig. 72). Do not displace mainshaft bearings when installing differential.
(10) Install differential snap-ring (Fig. 73).
(11) Install intermediate clutch shaft (Fig. 74).
(12) Install clutch shaft thrust washer (Fig. 75).
(13) Install clutch shaft snap-ring (Fig. 76).
(14) Inspect mode fork assembly (Fig. 77). Replace pads and bushing if necessary. Replace fork tube if bushings inside tube are worn or damaged. Also check springs and slider bracket (Fig. 77). Replace worn, damaged components.
Fig. 71 Installing Mainshaft Bearing Rollers and Spacers
1 - MAINSHAFT BEARING ROLLERS
2 - BEARING SPACERS
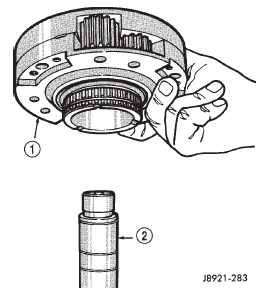
Fig. 72 Differential Installation
1 - DIFFERENTIAL
2 - MAINSHAFT
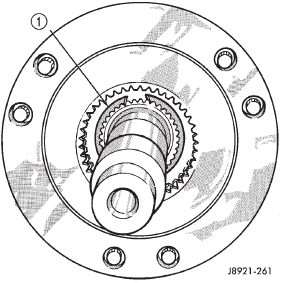
Fig. 73 Installing Differential Snap-Ring
1 - DIFFERENTIAL SNAP RING
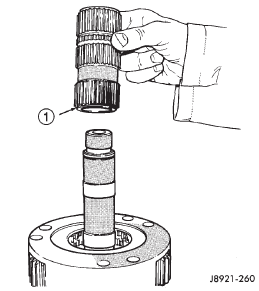
Fig. 74 Installing Intermediate Clutch Shaft
1 - INTERMEDIATE CLUTCH SHAFT
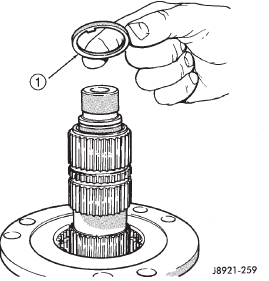
Fig. 75 Installing Clutch Shaft Thrust Washer
1 - CLUTCH SHAFT THRUST RING
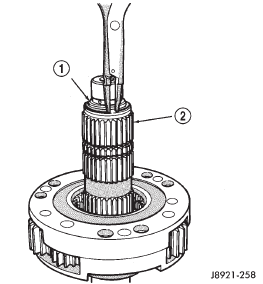
Fig. 76 Installing Clutch Shaft Snap-Ring
1 - SNAP RING
2 - INTERMEDIATE CLUTCH SHAFT

Fig. 77 Mode Fork Assembly Inspection
1 - SLIDER
2 - MODE FORK
3 - BUSHING/SPRING
4 - TUBE
5 - PADS
(15) Install mode sleeve in mode fork (Fig. 78).
Then install assembled sleeve and fork on mainshaft.
Be sure mode sleeve splines are engaged in differential splines.
(16) Install mode fork and mainshaft assembly in case (Fig. 79). Rotate mainshaft slightly to engage shaft with low range gears.
(17) Rotate mode fork pin into shift sector slot.
(18) Install shift rail (Fig. 80). Be sure rail is seated in both shift forks.
(19) Rotate shift sector to align lockpin hole in low range fork with access hole in case.
(20) Insert an easy-out in range fork lockpin to hold it securely for installation (Fig. 81). Lockpin is slightly tapered on one end. Insert tapered end into fork and rail.
(21) Insert lockpin through access hole and into shift fork (Fig. 81). Then remove easy-out and seat the pin with pin punch.
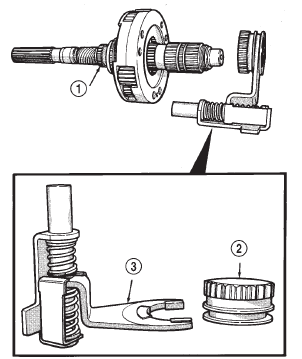
Fig. 78 Installing Mode Fork And Sleeve
1 - MAINSHAFT
2 - SLEEVE
3 - MODE FORK ASSEMBLY
(22) Install plug in lockpin access hole.
(23) Install detent plunger, detent spring and detent plug in case (Fig. 82).
FRONT OUTPUT SHAFT AND DRIVE CHAIN INSTALLATION
(1) Install front output shaft (Fig. 83).
(2) Install drive chain (Fig. 83). Engage chain with front output shaft sprocket teeth.
(3) Install drive sprocket (Fig. 83). Engage drive sprocket teeth with chain. Then engage sprocket splines with mainshaft splines.
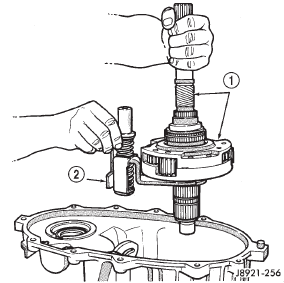
Fig. 79 Assembled Mainshaft And Mode Fork
Installation
1 - MAINSHAFT ASSEMBLY
2 - MODE FORK
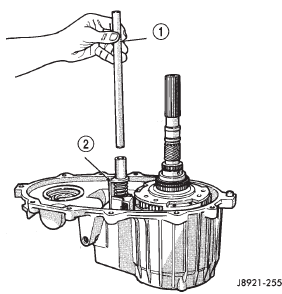
Fig. 80 Shift Rail Installation
1 - SHIFT RAIL
2 - MODE FORK
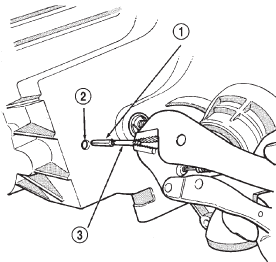
Fig. 81 Installing Low Range Fork Lockpin
1 - LOW RANGE FORK LOCK PIN
2 - ACCESS HOLE
3 - EASY-OUT
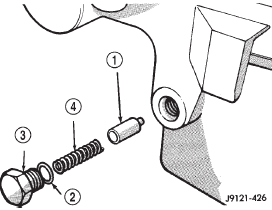
Fig. 82 Detent Pin, Spring And Plug Installation
1 - PLUNGER
2 - O-RING
3 - PLUG
4 - SPRING
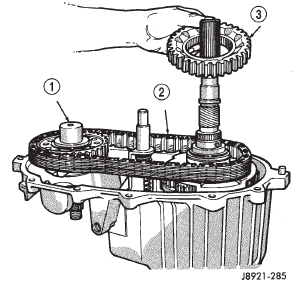
Fig. 83 Drive Chain And Sprocket Installation
1 - FRONT OUTPUT SHAFT
2 - DRIVE CHAIN
3 - DRIVE SPROCKET
(4) Install drive sprocket snap-ring (Fig. 84).
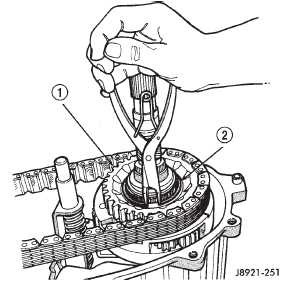
Fig. 84 Drive Sprocket Snap-Ring Installation
1 - DRIVE SPROCKET
2 - DRIVE SPROCKET SNAP RING
OIL PUMP AND REAR CASE INSTALLATION
(1) Insert oil pickup tube in oil pump and attach oil screen and connector hose to pickup tube. Then install assembled pump, tube and screen in rear case (Fig. 85). Be sure screen is seated in case slot as shown.
(2) Install magnet in front case pocket (Fig. 86).
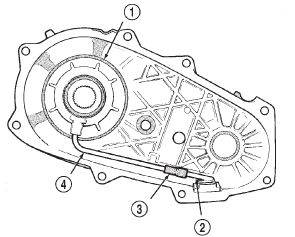
Fig. 85 Oil Screen And Pickup Tube Installation
1 - OIL PUMP
2 - OIL SCREEN
3 - CONNECTOR
4 - PICKUP TUBE
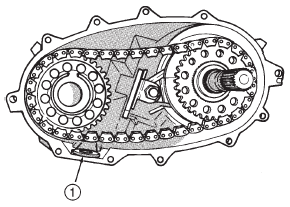
Fig. 86 Installing Case Magnet
1 - MAGNET
(3) Apply 3 mm (1/8 in.) wide bead of Mopar gasket maker or silicone adhesive sealer to seal surface of front case.
(4) Align and install rear case on front case. Be sure case locating dowels are in place and that mainshaft splines are engaged in oil pump inner gear.
(5) Install and tighten front case-to-rear case bolts to 41 N·m (30 ft. lbs.) torque. Be sure to install a washer under each bolt used at case dowel locations.
REAR RETAINER INSTALLATION
(1) Remove rear bearing in retainer using Installer 8128 and Handle C-4171.
(2) Install rear bearing in retainer with Tools C-4171 and 5064 (Fig. 87).
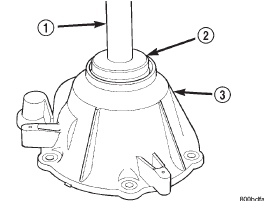
Fig. 87 Installing Rear Bearing In Retainer
1 - SPECIAL TOOL C-4171
2 - SPECIAL TOOL 5064
3 - REAR RETAINER
(3) Install rear bearing O. D. retaining ring with snap-ring pliers (Fig. 88). Be sure retaining ring is fully seated in retainer groove.
(4) Apply bead of Mopart Sealer P/N 82300234, or Loctitey Ultra Gray, to mating surface of rear retainer. Sealer bead should be a maximum of 3/16 in.
(5) Install rear retainer on rear case. Tighten retainer bolts to 20-27 N·m (15-20 ft. lbs.) torque.
(6) Install rear bearing I. D. retaining ring and spacer on output shaft.
(7) Apply liberal quantity of petroleum jelly to new rear seal and to output shaft. Petroleum jelly is needed to protect seal lips during installation.
(8) Slide seal onto Seal Protector 6992 (Fig. 89).
Slide seal protector and seal onto output shaft.
(9) Slide Installer C-4076-B onto seal protector with the recessed side of the tool toward the seal. Drive seal into rear bearing retainer with Installer C-4076-B and Handle MD-998323 (Fig. 90).

Fig. 88 Rear Bearing Retaining Ring Installation
1 - REAR BEARING O. D. RETAINING RING
2 - SNAP RING PLIERS
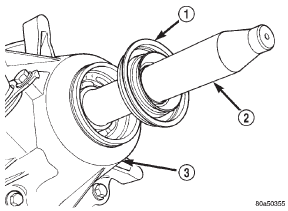
Fig. 89 Output Shaft Seal and Protector
1 - OUTPUT SHAFT SEAL
2 - SPECIAL TOOL 6992
3 - TRANSFER CASE
(10) Install rear slinger with Installer 8408.
(11) Install boot on output shaft slinger and crimp retaining clamp with tool C-4975-A (Fig. 91).
FRONT YOKE AND SWITCH INSTALLATION
(1) Install indicator switch in front case. Tighten switch to 20-34 N·m (15-25 ft. lbs.) torque.
(2) Lubricate yoke hub with transmission fluid and install yoke on front shaft.
(3) Install new seal washer on front shaft.
(4) Install yoke on front shaft. Secure yoke with new nut.
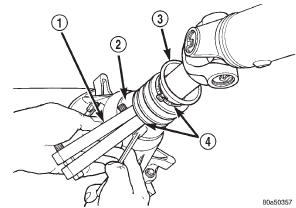
Fig. 91 Slinger Boot Installation
1 - SPECIAL TOOL C-4975-A
2 - SLINGER
3 - BOOT
4 - CLAMP
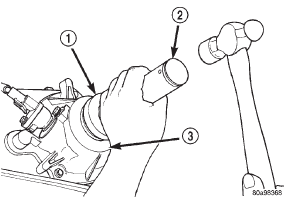
Fig. 90 Rear Seal Installation
1 - SPECIAL TOOL C-4076-B
2 - SPECIAL TOOL MD998323
3 - TRANSFER CASE
 Description and operation. Diagnosis and testing. Removal and installation

Other materials:
Stationary glass. Description and operation. Removal and installation
Description and operation
WINDSHIELD SAFETY PRECAUTIONS
DESCRIPTION
WARNING: DO NOT OPERATE THE VEHICLE WITHIN 24 HOURS OF WINDSHIELD INSTALLATION.
IT TAKES AT LEAST 24 HOURS FOR URETHANE ADHESIVE TO CURE. IF IT IS NOT CURED, THE WINDSHIELD MAY NOT PERFORM PROPERLY IN AN ACCIDENT.
URETHANE AD ...