Jeep Cherokee (XJ): Front door hinge. Front door restraint. Front door outside handle
REMOVAL (1) Remove door restraint (check) retaining pin.
(2) Remove door hinge bolts and shims (Fig. 26).
(3) Retain door hinge shims for correct installation. INSTALLATION (1) Position hinge plates and shims on door face.
1 - UPPER HINGE (2) Align door hinges and shims with bolt holes
and install hinge bolts. Tighten bolts to 3 N·m (2 ft.
lbs.) torque.
(3) Adjust/align latch striker and latch as necessary.
(4) Install door restraint (check) retaining pin. REMOVAL (1) Remove door trim panel.
(2) Remove door radio speaker from door inner
panel.
(3) Remove door restraint (check) retaining pin
from bracket with a punch.
(4) Remove nuts and remove restraint via speaker
opening. (Fig. 27). INSTALLATION (1) Position door restraint in door by way of opening
and install nuts.
NOTE: Ensure the spring on the door restraint is
facing outward.
(2) Position door restraint in bracket with holes
aligned and insert retaining pin.
(3) Install radio speaker and door trim panel. REMOVAL (1) Remove the door trim panel and waterdam.
1 - A-PILLAR (2) Remove the access hole cover and remove the
rearward nut attaching the door handle to the door.
(Fig. 28).
(3) Disconnect the handle-to-latch rod from the
handle latch release lever arm.
(4) Remove the forward nut attaching the handle
to the door.
(5) Separate the handle from the door.
1 - OUTSIDE DOOR HANDLE INSTALLATION (1) Position the handle in the door.
(2) Install the forward nut attaching the handle to
the door.
(3) Connect the latch to handle rod, to the handle
latch release lever arm.
(4) Install the rearward nut attaching the door
handle to the door.
(5) Install the access hole cover.
(6) Install the door waterdam and trim panel.Front door hinge
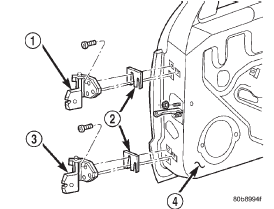
Fig. 26 Front Door Hinge
2 - SHIM
3 - LOWER HINGE
4 - FRONT DOORFront door restraint
Front door outside handle
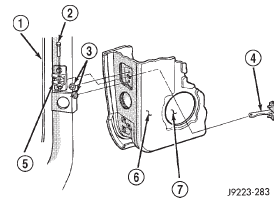
Fig. 27 Door Restraint (Check)
2 - RETAINING PIN
3 - NUT
4 - DOOR RESTRAINT
5 - RESTRAINT BRACKET
6 - DOOR INNER PANEL
7 - SPEAKER OPENING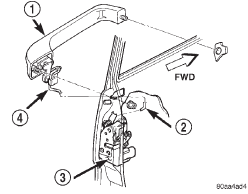
Fig. 28 Front Door Outside Handle
2 - OUTSIDE HANDLE TO LATCH ROD
3 - DOOR LATCH
4 - OUTSIDE HANDLE TO LATCH ROD
 Front door trim panel. Front door waterdam. Front door
 Front door lock cylinder. Lock cylinders. Front door latch
Other materials:
Cleaning and inspection
NV231 TRANSFER CASE
Clean the transfer case parts with a standard
parts cleaning solvent. Remove all traces of sealer
from the cases and retainers with a scraper and 3M
all purpose cleaner. Use compressed air to remove
solvent residue from oil feed passages in the case
halves, retainers, gears ...