Jeep Cherokee (XJ): Front door outer belt weatherstrip. Front door glass run channel weatherstrip. Front door opening weatherstrip
REMOVAL (1) Roll window down.
(2) Using a trim stick, pry up the rear outer corner
of the weatherstrip.
(3) Lift the weatherstrip up to separate from the
door (Fig. 32). INSTALLATION (1) Position the weatherstrip on the door.
(2) Push weatherstrip down to seat onto door. REMOVAL (1) Remove door trim panel.
(2) Remove waterdam.
(3) Starting at rear corner, peel weatherstrip from
around door frame. INSTALLATION (1) Install the weatherstrip in the following
sequence: (2) As applicable, move upward and forward
evenly until the weatherstrip seal is fully seated in
the channel.
(3) Install waterdam.
(4) Install door trim panel. REMOVAL (1) Remove A-pillar trim panel.
(2) Remove B-pillar upper trim panel.
(3) Remove cowl side trim panel.
(4) Remove inner scuff plate.
(5) Remove B-pillar lower trim panel.
(6) Grasp seal and separate from door opening.
1 - FRONT DOOR SEAL INSTALLATION (1) Position weatherstrip at corners.
(2) Move upward and around edge of door opening.
Seat seal on flange.
(3) When installing a door opening weatherstrip
seal, start at the door sill center line.
(4) Move upward and around the perimeter of the
door opening and seat the weatherstrip on the flange
(Fig. 34).
(5) Install cowl side trim panel.
(6) Install inner scuff plate.
(7) Install B-pillar lower trim panel.
(8) Install B-pillar upper trim panel.
(9) Install A-pillar trim panel.
1 - VENT HOLESFront door outer belt weatherstrip
Front door glass run channel
weatherstrip
Front door opening weatherstrip
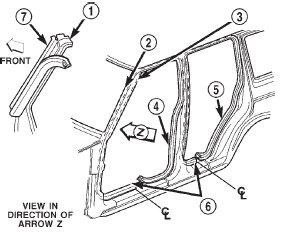
Fig. 33 Door Opening Weatherstrip
2 - A PILLAR
3 - SECONDARY DOOR SEAL
4 - FRONT DOOR SEAL
5 - REAR DOOR SEAL
6 - ENDS MEET AT CENTERLINE
7 - A PILLAR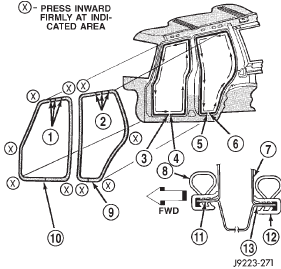
Fig. 34 Door Opening Weatherstrip
2 - VENT HOLES
3 - FINISH
4 - START
5 - FINISH
6 - START
7 - B-PILLAR
8 - SEAL
9 - REAR DOOR WEATHERSTRIP SEAL
10 - FRONT DOOR WEATHERSTRIP SEAL
11 - FLANGE
12 - SEAL
13 - FLANGE
 Front door latch striker. Front door inside handle actuator. Front door inner belt weatherstrip

Other materials:
Blower motor. Blower motor relay. Blower motor resistor
Blower motor
WARNING: ON VEHICLES EQUIPPED WITH AIRBAGS,
REFER TO GROUP 8M - PASSIVE RESTRAINT
SYSTEMS BEFORE ATTEMPTING ANY STEERING
WHEEL, STEERING COLUMN, OR INSTRUMENT
PANEL COMPONENT DIAGNOSIS OR SERVICE. FAILURE
TO TAKE THE PROPER PRECAUTIONS COULD
RESULT IN ACCIDENTAL AIRBAG DEPLOYMENT
...