Jeep Cherokee (XJ): Front door spacer blocks-twodoor vehicles. Front door glass. Rear door trim panel
REMOVAL (1) Upper spacer block: drill-out the rivet heads
and remove them from the reinforcement plate (Fig.
39).
(2) Lower spacer block: remove the screws from
the door face (Fig. 40).
(3) As applicable, remove the spacer block from the
door window frame or door face.
1 - FRONT DOOR WINDOW FRAME INSTALLATION (1) As applicable, position the spacer block on the
door window frame or door face.
(2) Upper spacer block: Install the replacement
rivets in the spacer block and reinforcement plate.
(3) Lower spacer block: install the screws in the
door face. Tighten the screws to 1 N·m (11 in-lbs)
torque. REMOVAL (1) Remove the door trim panel.
(2) Remove the waterdam.
1 - DOOR SPACER (3) Remove inner and outer belt weatherstrip.
(4) Roll glass up to expose the bolts attaching the
glass to the regulator.
(5) Remove the bolts attaching the glass to the
regulator (Fig. 41).
(6) Lift the glass upward and out of the door.
1 - NUT INSTALLATION (1) Position the glass in the door.
(2) Install the bolts attaching the glass to the regulator
Tighten the bolts to 4 N·m (36 in-lbs) torque.
(3) Install inner and outer belt weatherstrip. (4) Attach the door waterdam to the door inner
panel with adhesive/sealant.
(5) Install the waterdam.
(6) Install the door trim panel. REMOVAL (1) Roll window down.
(2) Remove window crank, if equipped (Fig. 42).
(3) Remove the screws attaching the trim panel to
the door inner panel (Fig. 43) and (Fig. 44).
(4) Separate the trim panel fasteners from door
inner panel with a pry tool (use special tool C-4829)
(Fig. 45).
(5) Lift the trim panel up and outward to separate
from the inner belt seal.
(6) Move the door trim panel outward and disconnect
the handle-to-latch rods (Fig. 46).
(7) Disconnect the power windows wire harness
connectors, if equipped.
(8) Remove the trim panel from door.
1 - WINDOW CRANK REMOVAL TOOL INSTALLATION (1) Replace any broken or damaged push-in fasteners.
(2) Connect the power window wire harness connectors,
if equipped.
(3) Move the door trim panel outward and connect
the handle-to-latch rods.
(4) Position the trim panel on the inner belt seal
and push down to seat.
(5) Align the locating pins and push-in fasteners
(Fig. 47). Press inward to secure.
(6) Install the screws attaching the trim panel to
the door inner panel.
(7) Install the window crank, if equipped.
1 - TRIM PANEL
1 - U-NUTFront door spacer blocks-twodoor
vehicles
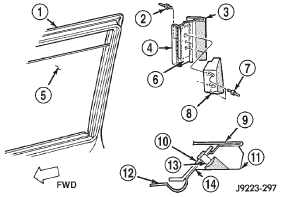
Fig. 39 Front Door Upper Spacer Block-Two-Door
2 - RIVET
3 - WINDOW OUTER FRAME
4 - WINDOW INNER FRAME
5 - WINDOW GLASS
6 - REINFORCEMENT PLATE
7 - RIVET
8 - DOOR UPPER SPACER BLOCK
9 - WINDOW OUTER FRAME
10 - REINFORCEMENT PLATE
11 - DOOR UPPER SPACER BLOCK
12 - WINDOW INNER FRAME
13 - RIVET
14 - ADHESIVEFront door glass
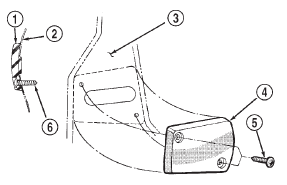
Fig. 40 Front Door Lower Spacer Block-Two-Door
2 - DOOR FACE
3 - DOOR FACE
4 - DOOR SPACER
5 - SCREW
6 - SCREW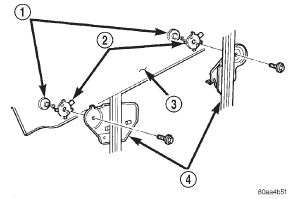
Fig. 41 Front Door Glass
2 - RETAINER
3 - WINDOW GLASS
4 - REGULATORRear door trim panel
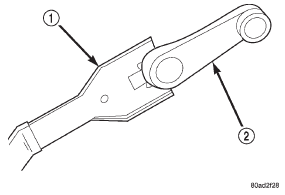
Fig. 42 Window Crank-Typical
2 - WINDOW CRANK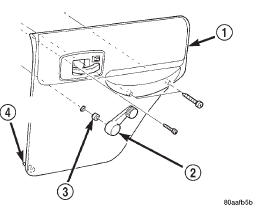
Fig. 43 Rear Door Trim Panel-Manual Window
2 - WINDOW CRANK
3 - SPACER
4 - PUSH-IN FASTENER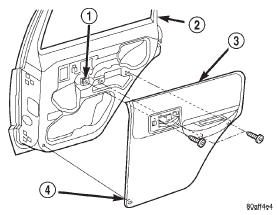
Fig. 44 Rear Door Trim Panel-Power Window
2 - REAR DOOR
3 - TRIM PANEL
4 - PUSH-IN FASTENER

 Rear door waterdam. Rear door. Rear door restraint
Other materials:
Driver information display (did)
The Driver Information Display (DID) features a driverinteractive
display that is located in the instrument
cluster.
Driver Information Display (DID) Location
The DID Menu items consist of the following:
Speedometer
Vehicle Info
Driver Assist
Fuel Economy
Trip
Stop/Start Info - ...