Jeep Cherokee (XJ): Liftgate latch. Liftgate latch striker. Liftgate weatherstrip
REMOVAL (1) Raise liftgate.
(2) Remove liftgate trim panel.
(3) Remove screws attaching latch to liftgate (Fig.
92).
(4) Disconnect rod from latch.
(5) Disconnect power lock connector from handle, if
equipped.
(6) Remove latch from liftgate.
1 - POWER ACTUATOR INSTALLATION (1) Position latch in liftgate.
(2) Connect power lock connector to handle, if
equipped.
(3) Connect latch rod.
(4) Install screws attaching latch to liftgate.
Tighten screws to 13 N·m (9 ft. lbs.) torque.
(5) Install liftgate trim panel. REMOVAL (1) From underside of vehicle, remove nuts attaching
striker to floor pan (Fig. 93).
(2) Separate striker from vehicle. INSTALLATION (1) Position striker on vehicle.
(2) Install nuts. Tighten nuts to 54 N·m (40 ft.
lbs.) torque.
1 - OVERSLAM BUMPER REMOVAL (1) Pull the seal away from the flange around the
perimeter of liftgate opening and remove it.
(2) Clean the flange as necessary. INSTALLATION (1) Position weatherstrip seal in the opening with
the left end of the seal at the opening centerline.
Install the seal in a clockwise direction.
(2) Move to the left and mate the seal with the
bottom-left flange (Fig. 94).
(3) Move upward and mate the seal with the leftside
flange.
(4) Move to the right and mate the seal with the
top-left roof flange.
(5) Seat the installed part of the seal with a roller.
Move the roller from the left-bottom end of seal to
the top-left half of the seal.
(6) Move to the right and mate the seal with the
top-right roof flange.
(7) Move downward and mate the seal with the
right-side flange.
(8) Move to the left and mate the seal with the
bottom-right flange.
(9) Center and butt seal the ends together at the
centerline.
(10) Seat the remaining part of the seal with a
roller. Move the roller the from top-left half of the
seal to the right-bottom end of the seal.
1 - LIFTGATE OPENINGLiftgate latch
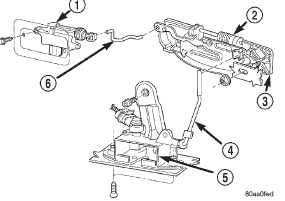
Fig. 92 Liftgate Latch
2 - LIFTGATE LOCK
3 - OUTSIDE HANDLE
4 - OUTSIDE HANDLE TO LATCH ROD
5 - LIFTGATE LATCH
6 - ACTUATOR TO LIFTGATE LOCK RODLiftgate latch striker
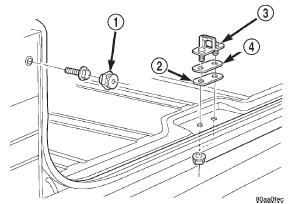
Fig. 93 Liftgagte Striker
2 - STRIKER PLATE
3 - STRIKER
4 - SHIMLiftgate weatherstrip
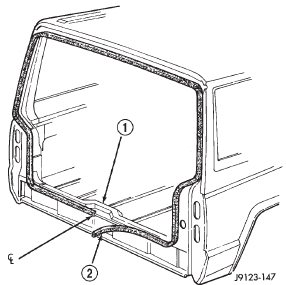
Fig. 94 Liftgate Weatherstrip Installation
2 - WEATHERSTRIP SEAL
 Liftgate support rod cylinder. Liftgate support rod ball stud. Liftgate outside handle

Other materials:
Adjustments. Specifications. Special tools
Adjustments
SHIFT LINKAGE ADJUSTMENT
(1) Shift transfer case into 4L position.
(2) Raise vehicle.
(3) Loosen lock bolt on adjusting trunnion (Fig.
97).
(4) Be sure linkage rod slides freely in trunnion.
Clean rod and apply spray lube if necessary.
(5) Verify that transfer case ran ...