Jeep Cherokee (XJ): Rear door latch striker. Rear door inside handle actuator. Rear door inner belt weatherstrip
REMOVAL (1) Using a grease pencil or equivalent, mark position
of striker.
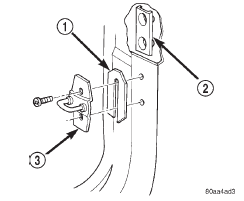
(2) Remove screws attaching striker to C-pillar
(Fig. 52).
(3) Separate striker from C-pillar. INSTALLATION (1) Position and align striker on C-pillar.
(2) Install screws attaching striker to C-pillar.
Tighten screws to 28 N·m (20 ft. lbs.) torque. REMOVAL The rear door inside handle actuator is heat staked
to the rear door trim panel during the manufacturing
process.
(1) Remove the door trim panel.
(2) Using an X-ACTO knife or equivalent, cut the
melted tabs securing the inside handle to the door
trim panel.
1 - SPACER (3) Separate the inside handle from the trim
panel. INSTALLATION (1) Position the inside handle in the trim panel.
(2) Heat stake the inside handle to the trim panel.
(3) Install the door trim panel. REMOVAL (1) Roll window down.
(2) Remove door trim panel.
(3) Pull up on the rear corner of the weatherstrip
and lift from the door (Fig. 53). INSTALLATION (1) Position the weatherstrip on the door.
(2) Push weatherstrip down to seat onto door.
(3) Install door trim panel.Rear door latch striker
Rear door inside handle actuator

Fig. 52 Rear Door Latch Striker
2 - TAPPING PLATE
3 - STRIKERRear door inner belt weatherstrip
 Rear door hinge. Rear door outside handle. Rear door latch
Other materials:
Steering wheel audio controls
The remote sound system controls are located on the rear
surface of the steering wheel. Reach behind the wheel to
access the switches.
Remote Sound System Controls (Back View Of Steering Wheel)
The right-hand control is a rocker-type switch with a
pushbutton in the center and controls the v ...

