Jeep Cherokee (XJ): Rear door outer belt weatherstrip. Rear door glass run channel weatherstrip. Rear door glass exterior molding
REMOVAL (1) Roll window down.
(2) Using a trim stick, pry up the rear outer corner
of the weatherstrip.
(3) Slowly and carefully, lift the weatherstrip up to
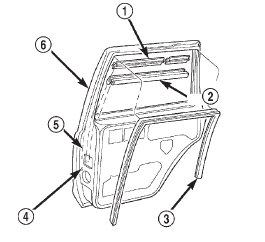
separate from the door (Fig. 53).
1 - OUTER BELT WEATHERSTRIP INSTALLATION (1) Position the weatherstrip on the door.
(2) Push weatherstrip down to seat onto door. REMOVAL (1) Remove door trim panel.
(2) Remove waterdam.
(3) Remove window glass.
(4) Starting at rear corner, peel weatherstrip from
around door frame (Fig. 53). INSTALLATION (1) Starting at the top corner, press seal into place.
A small amount of adhesive can be used to hold the
weatherstrip in-place, if necessary.
(2) As applicable, move downward evenly until the
weatherstrip seal is fully seated in the channel.
(3) Install window glass.
(4) Install waterdam.
(5) Install door trim panel. REMOVAL (1) Open the window.
(2) Remove the outer belt molding.
(3) Pry and pull the molding sections from the
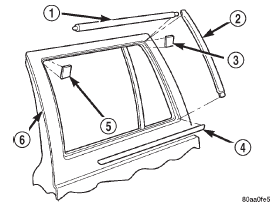
door panel flange (Fig. 54).
1 - UPPER MOLDING INSTALLATION (1) Starting at the forward end of the upper molding,
force the molding onto the door panel flange and
continue rearward until it is completely seated on
the flange.
(2) Mate the rear molding with the upper molding
and force the molding edge inward.
(3) Continue pressing and moving downward to
complete the installation.
(4) Install the outer belt molding.Rear door outer belt weatherstrip

Fig. 53 Rear Door Inner/Outer Belt Weatherstrip
2 - INNER BELT WEATHERSTRIP
3 - GLASS CHANNEL WEATHERSTRIP
4 - DOOR INNER PANEL
5 - GLASS CHANNEL
6 - DOOR OUTER PANELRear door glass run channel
weatherstrip
Rear door glass exterior molding

Fig. 54 Rear Glass Exterior Molding
2 - MOLDING
3 - SHIM
4 - OUTER BELT MOLDING
5 - SHIM
6 - OUTER DOOR PANEL
 Rear door latch striker. Rear door inside handle actuator. Rear door inner belt weatherstrip
 Rear door weatherstrip. Rear door window regulator. Rear door window glass
Other materials:
Off-road driving tips
When To Use 4WD LOW Range
When off-road driving, shift to 4WD LOW for additional
traction and control on slippery or difficult terrain,
ascending or descending steep hills, and to increase
low-speed pulling power (refer to "All Wheel Drive and
Four-Wheel Drive Operation" in this section for furt ...
