Jeep Cherokee (XJ): Rear door weatherstrip. Rear door window regulator. Rear door window glass
REMOVAL (1) Remove B-pillar upper trim.
(2) Remove inner scuff plate.
(3) Remove B-pillar lower trim.
(4) Remove upper door opening trim.
(5) Grasp seal and separate from door opening
(Fig. 55).
1 - FRONT DOOR SEAL INSTALLATION (1) When installing a door opening weatherstrip
seal, start at the door sill center line.
(2) Move upward and around edge of door opening.
Seat seal on flange.
(3) Move upward and around the perimeter of the
door opening and seat the weatherstrip on the flange
(Fig. 56).
(4) Install upper door opening trim.
(5) Install inner scuff plate.
(6) Install B-pillar lower trim panel.
(7) Install B-pillar upper trim panel. REMOVAL (1) Remove the door trim panel.
(2) Remove the waterdam.
(3) Remove the bolt attaching the window glass to
the regulator and support the glass (Fig. 57).
(4) Remove the lower bolts attaching the regulator
to the inner door panel (Fig. 58).
(5) Remove the nuts attaching the regulator motor
to the inner door panel, if equipped.
(6) Loosen the upper bolt that attaches the regulator
to the inner door panel.
1 - VENT HOLES (7) Disconnect the wire harness connector from the
regulator drive motor, if equipped.
(8) Remove the regulator and drive motor, if
equipped. INSTALLATION (1) Position window regulator and, if equipped,
drive motor within the door panels.
(2) Install the fasteners attaching the regulator to
the door inner panel.
(3) Connect the regulator wire harness connector.
(4) Position the window glass at the regulator and
install the retainer, bushing and bolt.
(5) Install the waterdam.
(6) Install the trim panel. REMOVAL (1) Lower the window glass.
(2) Remove the trim panel.
1 - ANCHOR
1 - REAR DOOR (3) Remove the waterdam.
(4) Remove inner and outer beltline weatherstrip.
(5) Remove the window weatherstrip from the
door.
(6) Remove the division bar/stationary glass (Fig.
59).
(7) Remove the window glass screw, bushing and
retainer from the regulator.
1 - UPPER SCREW INSTALLATION (1) Install the glass in the door, and install the
retainer, bushing and screw.
(2) Tighten the glass attaching screw 6 N·m (53 inlbs)
torque.
(3) Install the division bar/stationary glass in the
door.
(4) Install the glass run channel weatherstrip.
(5) Install the inner and outer beltline weatherstrip.
(6) Install the waterdam.
(7) Install the trim panel.Rear door weatherstrip
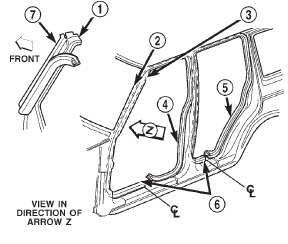
Fig. 55 Door Opening Weatherstrip
2 - A PILLAR
3 - SECONDARY DOOR SEAL
4 - FRONT DOOR SEAL
5 - REAR DOOR SEAL
6 - ENDS MEET AT CENTERLINE
7 - A PILLARRear door window regulator
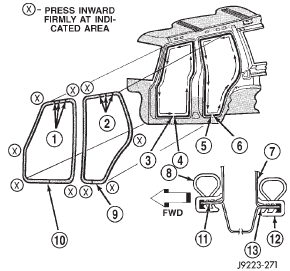
Fig. 56 Door Opening Weatherstrip
2 - VENT HOLES
3 - FINISH
4 - START
5 - FINISH
6 - START
7 - B-PILLAR
8 - SEAL
9 - REAR DOOR WEATHERSTRIP SEAL
10 - FRONT DOOR WEATHERSTRIP SEAL
11 - FLANGE
12 - SEAL
13 - FLANGERear door window glass
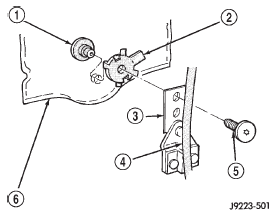
Fig. 57 Regulator To Glass Screw Removal/Installation
2 - RETAINER (WITH TABS)
3 - BRACKET
4 - REGULATOR
5 - SCREW AND BUSHING
6 - WINDOW GLASS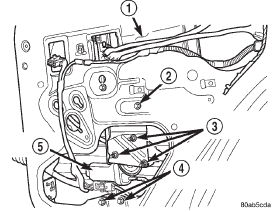
Fig. 58 Rear Door Window
2 - LOOSEN BOLT
3 - REMOVE NUTS
4 - REMOVE BOLTS
5 - REGULATOR MOTOR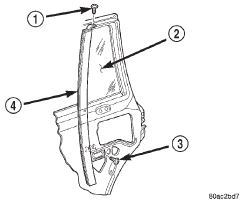
Fig. 59 Division Bar/Stationary Glass
2 - GLASS
3 - LOWER SCREW
4 - DIVISION BAR
 Body side molding. Rear fender flare. Quarter window applique
Other materials:
Disassembly and assembly
POWER DISTRIBUTION CENTER
The Power Distribution Center (PDC) cover, the
PDC housing lower cover, the PDC relay wedges, the
PDC relay cassettes and the PDC B(+) terminal stud
cover are available for service replacement (Fig. 10).
The PDC cover and B(+) terminal stud cover can be
simply unlat ...

